
Время на прочтение
Наверно, многие уже в курсе, что компания Let’s Encrypt раздает бесплатные SSL-сертификаты на https://letsencrypt.org. Как же его получить и настроить на своем сервере под управлением CentOS 7 и Nginx?
Введение
Давайте его получим. Let’s Encrypt это новый центр сертификации (CA), который позволяет простым способом бесплатно получить и установить TLS / SSl сертификат, позволяя нам шифровать HTTPS трафик на ваших веб-серверах. Этот процесс уже автоматизирован программой letsencrypt, но, к сожалению, только под управлению веб-серверами Apache.
В этом уроке я покажу вам, как получить SSL сертификат под Nginx, CentOS 7. Также настроим автоматическое продление сертификата, так как он дается на 90 дней.
Шаг 1 — Установка клиента Letsencrypt
Итак, что мы имеем:
— Веб сервер под управлением CentOS, Nginx;
— Установленные программы Git, Bc.
На всякий случай:
sudo yum -y install git bc
После того, как git и bc установлены, переходим к клонированию проекта letsencrypt из GitHub.
sudo git clone https://github.com/letsencrypt/letsencrypt /opt/letsencrypt
Теперь у вас должна быть копия проекта в /opt/letsencrypt.
Шаг 2 — Получение сертификата
Letsencrypt предоставляет множество способов получения SSL-сертификатов с помощью различных плагинов. В отличии от плагина Apache, который устанавливается автоматически, нам придется ставить сертификат вручную.
Установка сертификата SSL
Переходим к проекту Letsencrypt, куда мы клонировали файлы. И запускаем генерацию сертификатов командой letsencrypt-auto certonly, используя плагин webroot.
Примечание: запускаем приложение letsencrypt-auto без sudo
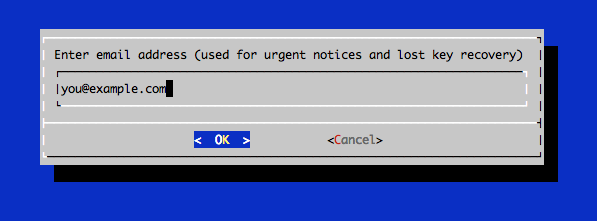
После того, как letsencrypt инициализирует, нам необходимо будет вести дополнительные данные. Предложенные вопросы могут варьироваться в зависимости от того, как давно вы использовали letsencrypt раньше, но мы запускаем первый раз.
В командной строке введите адрес электронной почты, который будет использоваться для информативных сообщений, а также будет возможность восстановить ключи:
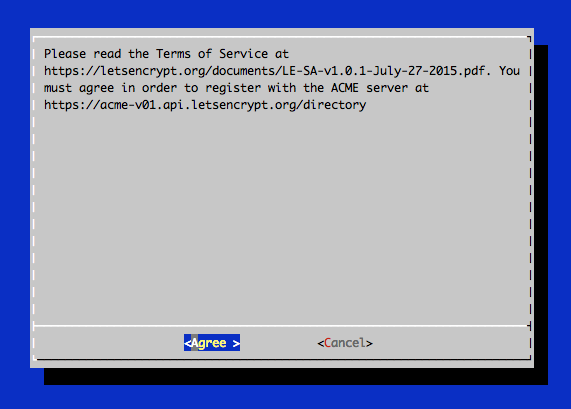
Соглашайтесь с условиями пользования Letsencrypt.
Если все прошло успешно, тогда в консоли вы должны увидеть примерно это:
Если вы получили ошибки, типа: Failed to connect to host for DVSNI challenge, настройте firewall вашего сервера, что бы TCP трафик проходил по портам 80 и 443.
После получения сертификата, вы будете иметь следующие PEM-закодированных файлы:
cert.pem: сертификат для вашего домена
chain.pem: Let’s Encrypt цепь сертификатов
fullchain.pem: cert.pem и chain.pem
privkey.pem: Сертификат с приватным ключом
В целях дальнейшего повышения уровня безопасности, мы сформируем ключ по алгоритму шифрования Диффи-Хеллмана. Чтобы создать 2048-битный ключ, используйте следующую команду:
Это нужно, чтобы у нас заработал Forward Secrecy. Прямая секретность означает, что если третья сторона узнает какой-либо сеансовый ключ, то она сможет получить лишь доступ к данным, защищенным лишь этим ключом. Для сохранения совершенной прямой секретности ключ, используемый для шифрования передаваемых данных, не должен использоваться для получения каких-либо дополнительных ключей.
Процесс может занять несколько минут, но когда ключ создастся, он будет помещен в каталог в /etc/ssl/certs/dhparam.pem.
Шаг 3 — Настройка TLS/SSl на веб-сервере Nginx
Настройка конфигурации Nginx, используя SSl — сертификаты.
sudo systemctl reload nginx
Шаг 4 — Настройка автопродление
Сертификаты действительный 90 дней, но рекомендуется продлевать сертификаты каждые 60 дней. Мы это автоматизируем с помощью cron.
Чтобы запустить процесс обновления для всех установленных доменов, выполните следующую команду:
Так как мы недавно установили сертификат, то команда будет проверять только дату истечения срока действия и распечатает сообщение, информирующее о том, что сертификат не нуждается в продлении. Вы увидите примерно следующие в консоли:
Обратите внимание, что если вы создали сертификат в комплекте с несколькими доменами, тогда только базовое имя домена будет отображено в консоли, но вы не пугайтесь, продлены будут все домены, включенные в этот сертификат.
Давайте отредактируем crontab, что бы наши сертификаты обновлялись автоматически. Проверку на обновления мы будем делать каждую неделю. Для редактирования crontab от root пользователя выполните команду:
sudo crontab -e
Добавим следующие строки:
Этак команда создаст cron, который каждый понедельник будет выполнять автоматическое продление letsencrypt сертификатов в 2:30 и перезагружать Nginx в 2:35. Вся информация об обновлении будет логироваться в /var/log/le-renew.log.
Шаг 5 — Обновление Let’s Encrypt (не обязательно)
Всякий раз, когда новые обновления доступны для клиента Let’s Encrypt, вы можете обновить локальную копию, запустив git pull из каталога /opt/letsencrypt:
cd /opt/letsencrypt
sudo git pull
Это позволит загрузить все последние изменения из хранилище для обновления клиента Let’s Encrypt.
Финиш! Ваш веб-сервер теперь использует шифрование TLS / SSL, и все это бесплатно. Давайте шифровать HTTPS контент, стоять на страже неприкосновенности частной жизни. Также это повысит видимость сайта в выдаче Google.

Данная статья предлагает пошаговую инструкцию по установке сертификата на HTTP сервер Apache. Обратите внимание, что с версии 2.4.8 Apache параметры конфигурации сервера были изменены.
1. Скопируйте файлы сертификатов на ваш сервер.
Вам нужно скопировать на сервер следующие файлы: сертификат сервера, закрытый (приватный) ключ и промежуточный сертификат, соответствующий типу Вашего сертификата сервера.
Сертификат сервера направлялся Вам по электронной почте после его выпуска в GlobalSign. Также Вы можете получить его в своей учётной записи GlobalSign, нажав на кнопку
«Edit» слева от номера заказа и скопировав сертификат в формате PEM.
Закрытый ключ для сертификата создаётся вместе с запросом на сертификат (CSR), поэтому файл закрытого ключа уже может находиться на Вашем сервере. Если приватный ключ утерян, то сертификат нужно перевыпустить.
Промежуточный (intermediate) сертификат, который потребуется установить на сервер, зависит от типа Вашего сертификата. Именно наличие промежуточного сертификата в цепочке позволяет связать Ваш сертификат с корневым (root) сертификатом GlobalSign и сделать цепочку доверенной. Загрузите один или несколько промежуточных сертификатов, соответственно типа Вашего сертификата, по ссылке ниже:
support.globalsign.com/customer/portal/topics/538410-root-certificates/articles
2. Откройте для редактирования конфигурационный файл Apache.
В зависимости от типа операционной системы путь директории конфигурационного
файла может быть разным:
3. Настройте виртуальный хост для работы сертификата.
Найдите раздел VirtualHost и добавьте (или отредактируйте, если они уже имеются) следующие директивы, указав актуальные пути к файлам сертификатов и ключа:
Убедитесь в правильности путей SSLCertificateFile, SSLCertificateKeyFile, SSLCertificateChainFile, каждый из них должен указывать на соответствующий файл.
Примечание: Начиная с версии Apache 2.4.8, вместо директивы SSLCertificateChainFile следует использовать директиву SSLCertificateFile, которая была расширена для поддержки промежуточных сертификатов. Добавление промежуточного сертификата в конец файла сертификата сервера создаст необходимую доверенную цепочку.
4. Протестируйте созданную конфигурацию сервера.
В зависимости от операционной системы, выполните команду:
apachectl configtest
apache2ctl configtest
Запуск команды обнаружит ошибки конфигурации сервера, такие как несоответствие закрытого ключа и сертификата либо неверный путь конфигурационного файла.
5. Перезапустите сервер Apache.
Для более старых версий дистрибутива Red Hat Enterprise Linux используйте скрипты:
service httpd restart
service apache2 restart
Для дистрибутивов Red Hat Linux 7 или CentOS 7.0 используйте следующие команды:
systemctl restart httpd.service
systemctl restart apache2.service
Примечание: некоторые конфигурации Apache могут отображать директиву SSLCACertificateFile.
Данное поле необходимо только, если сервер Apache используется для аутентификации клиента.
Директива SSLCACertificateFile будет указывать на сертификат удостоверяющего центра или директорию сертификатов, которые в свою очередь служат для выпуска сертификатов, принимаемых вами для аутентификации клиента.
В предыдущем топике я рассказал о сервисе где можно бесплатно получить ssl-сертификаты. И как бы в продолжение решил описать как установить их на то или иное ПО.
Я рассмотрю следующее ПО:
- Postfix
- Dovecot
- Nginx
Postfix
С постфиксом я намучился больше всего. Казалось бы, есть документация, куча примеров и тд, должно быть все просто, но нет, перепробовав кучу вариантов попутно перечитывая документацию я убил не мало времени пока все стало работать.
Подготовка
в /etc/postfix/main.cf добавляем:
smtpd_tls_CAfile = /etc/pki/tls/certs/ca-bundle.crt
smtpd_tls_cert_file = /etc/pki/postfix/mail.example.com.pem # путь к нашему файлу
smtpd_tls_key_file = /etc/pki/postfix/mail.example.com.pem # путь к нашему файлу
smtpd_tls_session_cache_database = btree:/var/lib/postfix/smtpd_tls_session_cache
smtpd_use_tls = yes
smtp_tls_CAfile = /etc/pki/tls/certs/ca-bundle.crt
smtp_tls_session_cache_database = btree:/var/lib/postfix/smtp_tls_session_cache
smtpd_tls_security_level = may
smtpd_tls_received_header = yes
smtpd_tls_loglevel = 1
smtpd_tls_auth_only = no
tls_random_source = dev:/dev/urandom
openssl s_client -starttls smtp -showcerts -connect localhost:25SSL handshake has read 4760 bytes and written 354 bytes
—
New, TLSv1/SSLv3, Cipher is DHE-RSA-AES256-SHA
Server public key is 4096 bit
Secure Renegotiation IS supported
Compression: NONE
Expansion: NONE
SSL-Session:
Protocol : TLSv1
Cipher : DHE-RSA-AES256-SHA
Session-ID: 418AA0ED7BA85B2B9301FA127D05DCAFABCEDC192101A6E75DD872FA3E528366
Session-ID-ctx:
Master-Key: 498FB41D5810A9768710936351DC92169B6D7DEFAHTEDBDUO60DE9349DA7EB5536F975A8BC4AF190466B637CC129A93E
Key-Arg : None
Krb5 Principal: None
Start Time: 1287331961
Timeout : 300 (sec)
Verify return code: 0 (ok)
—
250 DSN
smtps inet n — n — — smtpd
-o smtpd_tls_wrappermode=yes
-o smtpd_sasl_auth_enable=yes
На этом с постфиксом все.
Dovecot
С довекотом все оказалось намного проще и у меня все заработало с первого раза
Спасибо Andrey_Zentavr за данное дополнение к статье.
Nginx
С ним тоже все очень просто и в целом процедура не отличается от dovecot’овской
Погдотовка
ssl_protocols SSLv2 SSLv3 TLSv1;
ssl_ciphers ALL:!ADH:!EXPORT56:RC4+RSA:+HIGH:+MEDIUM:+LOW:+SSLv2:+EXP;
ssl_prefer_server_ciphers on;
На этом все, надеюсь кому-то этот топик окажется полезным.
UPD2: Спасибо rojer за ценное исправление.
Setting up an SSL secured Webserver with CentOS
This guide will explain how to set up a site over https. The tutorial uses a self signed key so will work well for a personal website or testing purposes. This is provided as is so proceed at your own risk and take backups!
Getting the required software
For an SSL encrypted web server you will need a few things. Depending on your install you may or may not have OpenSSL and mod_ssl, Apache’s interface to OpenSSL. Use yum to get them if you need them.
yum install mod_ssl openssl
Yum will either tell you they are installed or will install them for you.
Generate a self-signed certificate
Using OpenSSL we will generate a self-signed certificate. If you are using this on a production server you are probably likely to want a key from a Trusted Certificate Authority, but if you are just using this on a personal site or for testing purposes a self-signed certificate is fine. To create the key you will need to be root so you can either su to root or use sudo in front of the commands
# Generate private key
openssl genrsa -out ca.key 2048
# Generate CSR
openssl req -new -key ca.key -out ca.csr
# Generate Self Signed Key
openssl x509 -req -days 365 -in ca.csr -signkey ca.key -out ca.crt
# Copy the files to the correct locations
cp ca.crt /etc/pki/tls/certs
cp ca.key /etc/pki/tls/private/ca.key
cp ca.csr /etc/pki/tls/private/ca.csr
restorecon -RvF /etc/pki
Then we need to update the Apache SSL configuration file
vi +/SSLCertificateFile /etc/httpd/conf.d/ssl.conf
Change the paths to match where the Key file is stored. If you’ve used the method above it will be
Quit and save the file and then restart Apache
All being well you should now be able to connect over https to your server and see a default Centos page. As the certificate is self signed browsers will generally ask you whether you want to accept the certificate.
Setting up the virtual hosts
Just as you set VirtualHosts for http on port 80 so you do for https on port 443. A typical VirtualHost for a site on port 80 looks like this
and then a VirtualHost record something like this:
Restart Apache again using
Configuring the firewall
You should now have a site working over https using a self-signed certificate. If you can’t connect you may need to open the port on your firewall. To do this amend your iptables rules:
iptables -A INPUT -p tcp —dport 443 -j ACCEPT
/sbin/service iptables save
iptables -L -v
In this tutorial, we will install an SSL certificate on the Apache web server for CentOS 8. This will ensure that website traffic is encrypted and HTTPS is used. First, you need a web server. How to install Apache on CentOS 8 was discussed earlier. An SSL certificate is required too. We recently looked at how to set up Apache virtual hosts on CentOS 8. It may be useful to learn it before proceeding to installing an SSL certificate.
In the Serverspace you can create a server with already installed app «Apache».
Checking mod_ssl
First, you need to make sure that mod_ssl is installed in the system. To check this use this command:
If you see no output, install mod_ssl:
dnf install mod_ssl
Place the SSL certificate on the server
You need to create a complete chain of your SSL certificate from its public key and the chain of certificate authorities.
chmod -R 600 /etc/pki/tls/private/
Apache configuration
Create a configuration file for your domain name if you don’t have one. Put it in the /etc/httpd/conf.d/ folder and give it a name with the .conf extension. Here and further replace domain-name.com with your own.
Create the /var/www/domain-name.com directory and put the content of your site there, if you haven’t already done so.
Redirect from HTTP to HTTPS
Save and close the file and restart Apache.
systemctl restart httpd
Now you have a configured SSL certificate on Apache with a working HTTPS protocol on your site.
Аverage rating :
+31 20 262-58-98
Introduction
TLS, or transport layer security, and its predecessor SSL, which stands for secure sockets layer, are web protocols used to wrap normal traffic in a protected, encrypted wrapper.
In this guide, you will set up a self-signed SSL certificate for use with an Apache web server on a CentOS 7 server.
For a more production-ready certificate solution, check out Let’s Encrypt, a free certificate authority. You can learn how to download and configure a Let’s Encrypt certificate in your setting up Apache with a Let’s Encrypt certificate on CentOS 7 tutorial.
Prerequisites
Before you begin with this guide, there are a few steps that need to be completed first.
Step 1 — Installing mod_ssl
In order to set up the self-signed certificate, you first have to be sure that mod_ssl, an Apache module that provides support for SSL encryption, is installed on the server. You can install mod_ssl with the yum command:
yum mod_ssl
The module will automatically be enabled during installation, and Apache will be able to start using an SSL certificate after it is restarted. You don’t need to take any additional steps for mod_ssl to be ready for use.
Step 2 — Creating a New Certificate
The /etc/ssl/certs directory, which can be used to hold the public certificate, should already exist on the server. You will need to create an /etc/ssl/private directory as well, to hold the private key file. Since the secrecy of this key is essential for security, it’s important to lock down the permissions to prevent unauthorized access:
/etc/ssl/private
/etc/ssl/private
Now, you can create a self-signed key and certificate pair with OpenSSL in a single command by typing:
openssl req rsa:2048 /etc/ssl/private/apache-selfsigned.key /etc/ssl/certs/apache-selfsigned.crt
You will be asked a series of questions. Before going over that, let’s take a look at what is happening in the command:
- openssl: This is the basic command line tool for creating and managing OpenSSL certificates, keys, and other files.
- req: This subcommand specifies that you want to use X.509 certificate signing request (CSR) management. The “X.509” is a public key infrastructure standard that SSL and TLS adheres to for its key and certificate management. You want to create a new X.509 cert, so you are using this subcommand.
- -x509: This further modifies the previous subcommand by telling the utility that you want to make a self-signed certificate instead of generating a certificate signing request, as would normally happen.
- -days 365: This option sets the length of time that the certificate will be considered valid. You set it for one year here.
- -newkey rsa:2048: This specifies that you want to generate a new certificate and a new key at the same time. You did not create the key that is required to sign the certificate in a previous step, so you need to create it along with the certificate. The rsa:2048 portion tells it to make an RSA key that is 2048 bits long.
- -keyout: This line tells OpenSSL where to place the generated private key file that you are creating.
- -out: This tells OpenSSL where to place the certificate that you are creating.
As stated above, these options will create both a key file and a certificate. You will be asked a few questions about your server in order to embed the information correctly in the certificate.
Fill out the prompts appropriately.
The entirety of the prompts will look something like this:
Both of the files you created will be placed in the appropriate subdirectories of the /etc/ssl directory.
As you are using OpenSSL, you should also create a strong Diffie-Hellman group, which is used in negotiating Perfect Forward Secrecy with clients.
You can do this by typing:
openssl dhparam /etc/ssl/certs/dhparam.pem
This may take a few minutes, but when it’s done you will have a strong DH group at /etc/ssl/certs/dhparam.pem that you can use in your configuration.
Step 3 — Setting Up the Certificate
You now have all of the required components of the finished interface. The next thing to do is to set up the virtual hosts to display the new certificate.
Open a new file in the /etc/httpd/conf.d directory:
Be sure to update the ServerName line to however you intend to address your server. This can be a hostname, full domain name, or an IP address. Make sure whatever you choose matches the Common Name you chose when making the certificate.
Setting Up Secure SSL Parameters
Next, you will add some additional SSL options that will increase your site’s security. The options you will use are recommendations from Cipherlist.eu. This site is designed to provide easy-to-consume encryption settings for popular software.
Note: The default suggested settings on Cipherlist.eu offer strong security. Sometimes, this comes at the cost of greater client compatibility. If you need to support older clients, there is an alternative list that can be accessed by clicking on the link labeled “Yes, give me a ciphersuite that works with legacy / old software.”
There are a few pieces of the configuration that you may wish to modify. First, you can add your preferred DNS resolver for upstream requests to the resolver directive. You used Google’s for this guide, but you can change this if you have other preferences.
Finally, you should take a moment to read up on HTTP Strict Transport Security, or HSTS, and specifically about the “preload” functionality. Preloading HSTS provides increased security, but can have far reaching consequences if accidentally enabled or enabled incorrectly. In this guide, you will not preload the settings, but you can modify that if you are sure you understand the implications.
The other changes you will make are to remove +TLSv1.3 and comment out the SSLSessionTickets and SSLOpenSSLConfCmd directives, since these aren’t available in the version of Apache shipped with CentOS 7.
When you are finished making these changes, you can save and close the file.
Creating a Redirect from HTTP to HTTPS (Optional)
As it stands now, the server will provide both unencrypted HTTP and encrypted HTTPS traffic. For better security, it is recommended in most cases to redirect HTTP to HTTPS automatically. If you do not want or need this functionality, you can safely skip this section.
To redirect all traffic to be SSL encrypted, create and open a file ending in .conf in the /etc/httpd/conf.d directory:
Save and close this file when you are finished.
Step 4 — Applying Apache Configuration Changes
By now, you have created an SSL certificate and configured your web server to apply it to your site. To apply all of these changes and start using your SSL encryption, you can restart the Apache server to reload its configurations and modules.
First, check your configuration file for syntax errors by typing:
As long as the output ends with Syntax OK, you are safe to continue. If this is not part of your output, check the syntax of your files and try again:
. . .
Syntax OK
Restart the Apache server to apply your changes by typing:
systemctl restart httpd.service
Next, make sure port 80 and 443 are open in your firewall. If you are not running a firewall, you can skip ahead.
If you have a firewalld firewall running, you can open these ports by typing:
firewall-cmd —add-servicehttp
firewall-cmd —add-servicehttps
firewall-cmd —runtime-to-permanent
If you have iptablesfirewall running, the commands you need to run are highly dependent on your current rule set. For a basic rule set, you can add HTTP and HTTPS access by typing:
iptables INPUT tcp tcp ACCEPT
iptables INPUT tcp tcp ACCEPT
Step 5 — Testing Encryption
Now, you’re ready to test your SSL server.
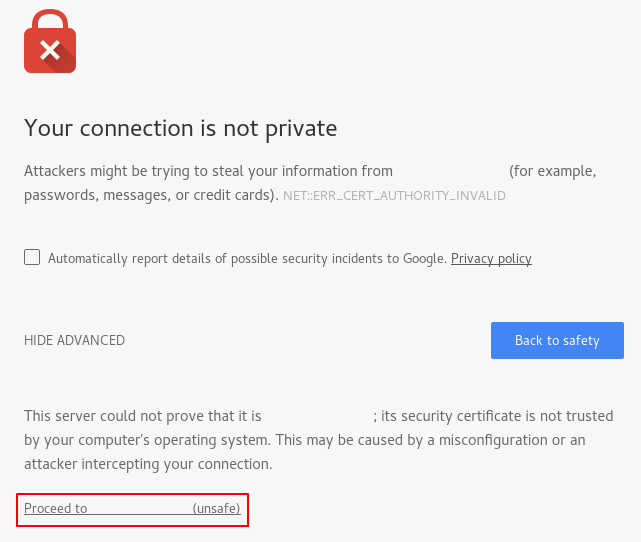
Because the certificate you created isn’t signed by one of your browser’s trusted certificate authorities, you will likely see a scary looking warning like the one below:
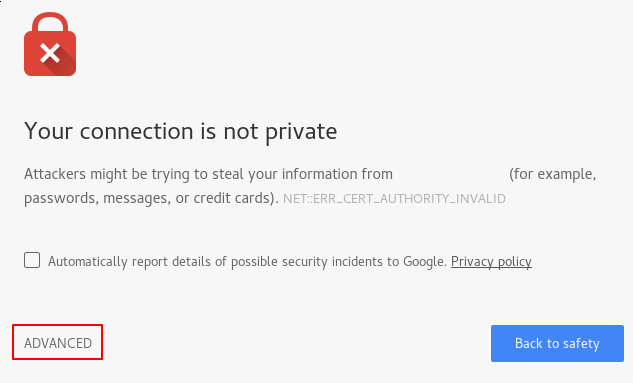
This is expected and normal. You are only interested in the encryption aspect of your certificate, not the third party validation of your host’s authenticity. Click “ADVANCED” and then the link provided to proceed to your host anyway:
You should be taken to your site. If you look in the browser address bar, you will see some indication of partial security. This might be a lock with an “x” over it or a triangle with an exclamation point. In this case, this just means that the certificate cannot be validated. It is still encrypting your connection.
If you configured Apache to redirect HTTP requests to HTTPS, you can also check whether the redirect functions correctly:
If this results in the same icon, this means that your redirect worked correctly.
Conclusion
You have configured your Apache server to handle both HTTP and HTTPS requests. This will help you communicate with clients securely and avoid outside parties from being able to read your traffic.
If you are planning on using SSL for a public website, you should probably purchase an SSL certificate from a trusted certificate authority to prevent the scary warnings from being shown to each of your visitors.
Let’s Encrypt is a Certificate Authority (CA) that provides free certificates for Transport Layer Security (TLS) encryption, thereby enabling encrypted HTTPS on web servers. It simplifies the process of creation, validation, signing, installation, and renewal of certificates by providing a software client that automates most of the steps—Certbot.
In order to complete this guide, you will need:
When you have all of these prerequisites completed, move on to install the Let’s Encrypt client software.
Step 1 — Installing the Certbot Let’s Encrypt Client
To use Let’s Encrypt to obtain an SSL certificate, you first need to install Certbot and mod_ssl, an Apache module that provides support for SSL v3 encryption.
The certbot package is not available through the package manager by default. You will need to enable the EPEL repository to install Certbot.
yum epel-release
Now that you have access to the repository, install all of the required packages:
yum certbot python2-certbot-apache mod_ssl
During the installation process you will be asked about importing a GPG key. This key will verify the authenticity of the package you are installing. To allow the installation to finish, accept the GPG key by typing y and pressing ENTER when prompted to do so.
With these services installed, you’re now ready to run Certbot and fetch your certificates.
Step 2 — Obtaining a Certificate
Now that Certbot is installed, you can use it to request an SSL certificate for your domain.
Using the certbot Let’s Encrypt client to generate the SSL Certificate for Apache automates many of the steps in the process. The client will automatically obtain and install a new SSL certificate that is valid for the domains you provide as parameters.
To execute the interactive installation and obtain a certificate that covers only a single domain, run the certbot command with:
certbot example.com
This runs certbot with the —apache plugin and specifies the domain to configure the certificate for with the -d flag.
certbot example.com www.example.com
The base domain in this example is example.com.
The certbot utility can also prompt you for domain information during the certificate request procedure. To use this functionality, call certbot without any domains:
The program will present you with a step-by-step guide to customize your certificate options. It will ask you to provide an email address for lost key recovery and notices, and then prompt you to agree to the terms of service. If you did not specify your domains on the command line, you will be prompted for that as well. If your Virtual Host files do not specify the domain they serve explicitly using the ServerName directive, you will be asked to choose the virtual host file. In most cases, the default ssl.conf file will work.
You will also be able to choose between enabling both http and https access or forcing all requests to redirect to https. For better security, it is recommended to choose the option 2: Redirect if you do not have any special need to allow unencrypted connections. Select your choice then hit ENTER.
When the installation is successfully finished, you will see a message similar to this:
IMPORTANT NOTES:
— Congratulations! Your certificate and chain have been saved at:
/etc/letsencrypt/live/example.com/fullchain.pem
Your key file has been saved at:
/etc/letsencrypt/live/example.com/privkey.pem
Your cert will expire on 2019-08-14. To obtain a new or tweaked
version of this certificate in the future, simply run certbot again
with the «certonly» option. To non-interactively renew *all* of
your certificates, run «certbot renew»
— If you like Certbot, please consider supporting our work by:
Donating to ISRG / Let’s Encrypt: https://letsencrypt.org/donate
Donating to EFF: https://eff.org/donate-le
The generated certificate files will be available within a subdirectory named after your base domain in the /etc/letsencrypt/live directory.
Now that your certificates are downloaded, installed, and loaded, you can check your SSL certificate status to make sure that everything is working.
Step 3 — Checking your Certificate Status
At this point, you can ensure that Certbot created your SSL certificate correctly by using the SSL Server Test from the cloud security company Qualys.
You will land on a page that immediately begins testing the SSL connection to your server:

Once the test starts running, it may take a few minutes to complete. The status of the test will update in your browser.
When the testing finishes, the page will display a letter grade that rates the security and quality of your server’s configuration. At the time of this writing, default settings will give an A rating:

Try reloading your website using https:// and notice your browser’s security indicator. It will now indicate that the site is properly secured, usually with a green lock icon.
With your SSL certificate up and verified, the next step is to set up auto-renewal for your certificate to keep your certificate valid.
Step 4 — Setting Up Auto Renewal
Let’s Encrypt certificates are valid for 90 days, but it’s recommended that you renew the certificates every 60 days to allow a margin of error. Because of this, it is a best practice to automate this process to periodically check and renew the certificate.
First, let’s examine the command that you will use to renew the certificate. The certbot Let’s Encrypt client has a renew command that automatically checks the currently installed certificates and tries to renew them if they are less than 30 days away from the expiration date. By using the —dry-run option, you can run a simulation of this task to test how renew works:
certbot renew —dry-run
The output should look similar to this:
Notice that if you created a bundled certificate with multiple domains, only the base domain name will be shown in the output, but the renewal will be valid for all domains included in this certificate.
A practical way to ensure your certificates will not get outdated is to create a cron job that will periodically execute the automatic renewal command for you. Since the renewal first checks for the expiration date and only executes the renewal if the certificate is less than 30 days away from expiration, it is safe to create a cron job that runs every week or even every day.
The official Certbot documentation recommends running cron twice per day. This will ensure that, in case Let’s Encrypt initiates a certificate revocation, there will be no more than half a day before Certbot renews your certificate.
0 0,12 * * * python -c ‘import random; import time; time.sleep(random.random() * 3600)’ && certbot renew
When you’re finished, press ESC to leave insert mode, then :wq and ENTER to save and exit the file. This will create a new cron job that will execute at noon and midnight every day. Adding an element of randomness to your cron jobs will ensure that hourly jobs do not all happen at the same minute, causing a server spike; python -c ‘import random; import time; time.sleep(random.random() * 3600)’ will select a random minute within the hour for your renewal tasks.
In this guide you installed the Let’s Encrypt Certbot client, downloaded SSL certificates for your domain, and set up automatic certificate renewal. If you have any questions about using Certbot, you can check the official Certbot documentation. We also recommend that you check the official Let’s Encrypt blog for important updates from time to time.
In this guide, you will set up a self-signed SSL certificate for use with an Nginx web server on a CentOS 7 server.
For a more production-ready certificate solution, check out Let’s Encrypt, a free certificate authority. You can learn how to download and configure a Let’s Encrypt certificate in our setting up Nginx with a Let’s Encrypt certificate on CentOS 7 tutorial.
Step 1 — Create the SSL Certificate
openssl req rsa:2048 /etc/ssl/private/nginx-selfsigned.key /etc/ssl/certs/nginx-selfsigned.crt
Fill out the prompts appropriately. The most important line is the one that requests the Common Name (e.g. server FQDN or YOUR name). You need to enter the domain name associated with your server or your server’s public IP address.
Step 2 — Configure Nginx to Use SSL
Create and open a file called ssl.conf in the /etc/nginx/conf.d directory:
Because you are using a self-signed certificate, the SSL stapling will not be used. Nginx will simply output a warning, disable stapling for your self-signed cert, and continue to operate correctly.
When you are finished, save and exit. This configures Nginx to use your generated SSL certificate to encrypt traffic. The SSL options specified ensure that only the most secure protocols and ciphers will be used. Note that this example configuration simply serves the default Nginx page, so you may want to modify it to meet your needs.
Create a Redirect from HTTP to HTTPS (Optional)
With your current configuration, Nginx responds with encrypted content for requests on port 443, but responds with unencrypted content for requests on port 80. This means that your site offers encryption, but does not enforce its usage. This may be fine for some use cases, but it is usually better to require encryption. This is especially important when confidential data like passwords may be transferred between the browser and the server.