
Test and restart Nginx
- Test Nginx configuration using
sudo nginx -t - If it’s success reload Nginx using
sudo /etc/init.d/nginx reload
Nginx is now setup to handle wildcard subdomains.
Good luck with building your application.Do let me know if you face any issues during the configuration :)I am available at Utkarsh Verma
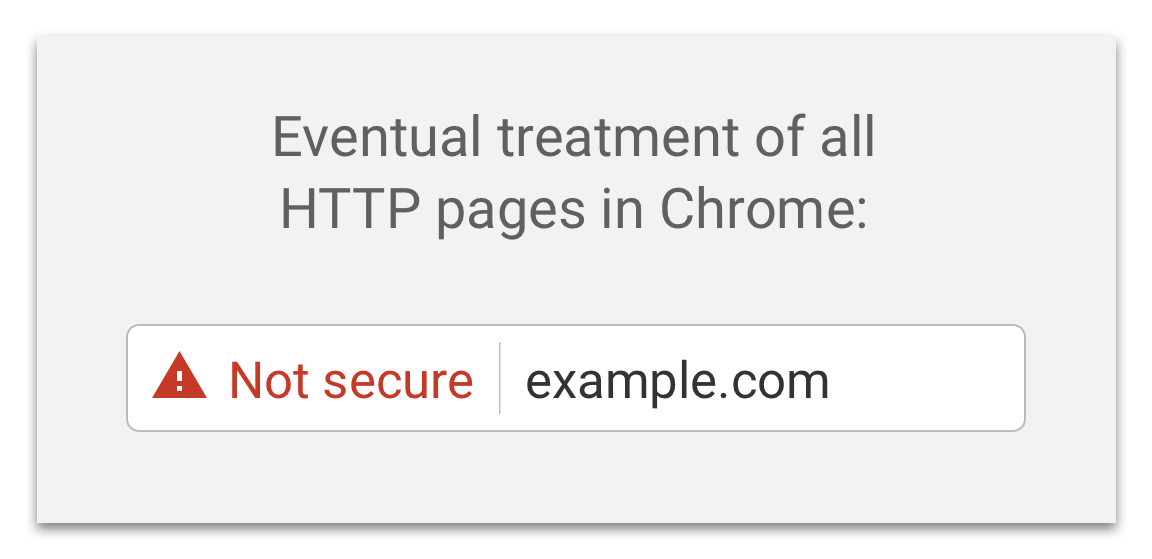
From past few days or months, everyone on the World Wide Web is talking about SSL certificates and rushing to implement them. But Why? Cause recently google has announced, if your website, webpages or web-applications does not have SSL certificate then Chrome will label them as Non-Secured.
In this blog will cover, how to generate a wildcard SSL certificate for your domain using Certbot. I am generating a certificate for the domain erpnext.xyz
В этом обзоре мы расскажем об особенностях установки и привязки бесплатного TLS/SSL сертификата от Let’s Encrypt для сайта на веб сервере IIS, запущенного на Windows Server 2019/2016/2012 R2.
Содержание:
- Let’s Encrypt и ACME клиенты для Windows
- Клиент WACS для установки TLS сертификата Let’s Encrypt в IIS на Windows Server
- Перенаправление трафика IIS сайта с HTTP на HTTPS адрес
- Использование сертификата Let’s Encrypt для Remote Desktop Services
В этой статье мы рассмотрим, как настроить бесплатный TLS/SSL сертфикат Let’s Encrypt для сайта на веб-сервере Nginx на Linux CentOS. Покажем, как выпустить сертификат для одного домена (или wildecard SSL-сертификат для всех поддоменов), настроить автопродление сертфикатов.
Содержание:
- Установка certbot — клиента Let’s Encrypt в Linux
- Выпуск SSL сертификата для Nginx
- Установка SSL сертификата Let’s Encrypt на веб-сайт Nginx
- Бесплатные Wildcard SSL сертификаты Let’s Encrypt для поддоменов
- Продление сертификатов Let’s Encrypt
To enable HTTPS on your website, you need to get a certificate (a type of file)
from a Certificate Authority (CA). Let’s Encrypt is a CA. In order to get a
certificate for your website’s domain from Let’s Encrypt, you have to demonstrate
control over the domain. With Let’s Encrypt, you do this using software that uses
the ACME protocol which typically runs
on your web host.
To figure out what method will work best for you, you will need to know whether
you have shell access (also known
as SSH access) to your web host. If you manage your website entirely through a
control panel like cPanel, Plesk, or
WordPress, there’s a good chance you don’t have shell
access. You can ask your hosting provider to be sure.
Чтобы включить протокол HTTPS на вашем сайте, вам необходимо получить сертификат (особый файл) из Центра сертификации (ЦС). Let’s Encrypt — это как раз ЦС. Перед получением сертификата для домена вашего сайта от Let’s Encrypt, вам нужно подтвердить право на владение доменом. Let’s Encrypt делает это с помощью специального ПО, использующего протокол ACME, который обычно работает на вашем веб-сервере.
Чтобы понять, какой способ получения сертификата подойдёт вам лучше, выясните, есть ли у вас доступ к оболочке (также известный как SSH-доступ) к вашему веб-серверу. Если вы администрируете сайты с помощью панели управления типа cPanel, Plesk или WordPress, то скорее всего такого доступа у вас нет. Если сомневаетесь — уточните у своего хостинг-провайдера.
Introduction
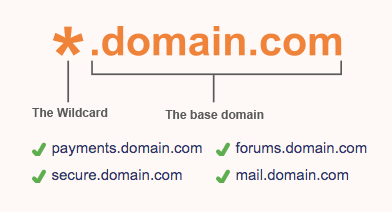
A wildcard certificate is an SSL certificate that can secure any number of subdomains with a single certificate. You may want a wildcard certificate in cases where you need to support multiple subdomains but don’t want to configure them all individually.
Let’s Encrypt is an SSL certificate authority that grants free certificates using an automated API. In this tutorial you will create a Let’s Encrypt wildcard certificate by following these steps:
- Making sure you have your DNS set up correctly
- Installing the Certbot plugins needed to complete DNS-based challenges
- Authorizing Certbot to access to your DNS provider
- Fetching your certificates
This information is intended to be useful for any Linux distribution and any server software, but you may have to fill in some gaps with further documentation, which we will link to as we go.
Intro
Recently, I started switching all my certificates that are soon expiring to Amazon issued ones which are automatically stored in AWS ACM. Limitation of that approach is that you can’t export such certificates. For that reason, I started using Let’s encrypt which allows me to use and store SSL certificates locally.
Since I am using AWS and cert manager I have a need to install following CLIs:
- AWS
- Certbot
To install them on your Macbook, you can simply use brew :
brew install awsclibrew install certbot
At the time of writing this article I am using following versions:
$ sudo certbot --versioncertbot 1.4.0$ aws --versionaws-cli/2.0.10 Python/3.8.3 Darwin/19.5.0 botocore/2.0.0dev14
In this story, I am aiming to cover the generation of a wildcard SSL certificate for domain.com using Certbot. Also, I will provide information how to import such certificate into AWS ACM.

The wildcard certificate is marked as demonstrated in the image and covers all possible subdomain under domain.com .
The author selected Code.org to receive a donation as part of the Write for DOnations program.
Introduction
Let’s Encrypt is a certificate authority (CA) that provides free certificates for Transport Layer Security (TLS) encryption. It provides a software client called Certbot which simplifies the process of certificate creation, validation, signing, installation, and renewal.
Let’s Encrypt now supports wildcard certificates which allow you to secure all subdomains of a domain with a single certificate. This will be useful if you want to host multiple services, such as web interfaces, APIs, and other sites using a single server.
To obtain a wildcard certificate from Let’s Encrypt you have to use one of Certbot’s DNS plugins, which include:
- certbot-dns-cloudflare
- certbot-dns-route53
- certbot-dns-google
- certbot-dns-digitalocean
The plugin you choose depends on which service hosts your DNS records. In this tutorial you will obtain a wildcard certificate for your domain using CloudFlare validation with Certbot on CentOS 7. You’ll then configure the certificate to renew it when it expires.
Сегодня в статье научимся получать сертификат WildCard от Let’s Encrypt для доменов третьего уровня.
Получать сертификат я буду для своего сайта работающего на Nginx + PHP-FPM.
Для начала нам необходимо установить утилиту CertBot. Для этого в терминале набираем следующее.
sudo add-apt-repository ppa:certbot/certbot
sudo apt-get update
sudo apt-get install python-certbot-nginx
Данными командами мы добавили репозиторий для certbot, обновили все репозитории и установили certbot для Nginx.
Если у вас еще не установлен WEB-сервер Nginx, то читаем статью как это сделать.
Получаем WildCard от Let’s Encrypt
Давайте наконец-то получим наш сертификат для поддоменов. но для начала в тестовом режиме. В терминале набираем:
sudo certbot --dry-run --manual --agree-tos --preferred-challenges dns certonly --server https://acme-v02.api.letsencrypt.org/directory -d *.obu4alka.ru -d obu4alka.ruНа что certbot выдаст вот такую запись:
Saving debug log to /var/log/letsencrypt/letsencrypt.log
Plugins selected: Authenticator manual, Installer None
Enter email address (used for urgent renewal and security notices) (Enter 'c' to cancel):
Ну тут все просто, необходимо ввести наш email для получения уведомлений о безопасности и оповещения о продлении. Двигаемся далее
- - - - - - - - - - - - - - - - - - - - - - - - - - - - - - - - - - - - - - - -
Would you be willing to share your email address with the Electronic Frontier
Foundation, a founding partner of the Let's Encrypt project and the non-profit
organization that develops Certbot? We'd like to send you email about our work
encrypting the web, EFF news, campaigns, and ways to support digital freedom.
- - - - - - - - - - - - - - - - - - - - - - - - - - - - - - - - - - - - - - - -
(Y)es/(N)o:
Тут нам сообщают чтобы мы поделились нашим адресом с разработчиками и всякими некоммерческими организациями. Я конечно отвечаю нет «N«
Obtaining a new certificate
Performing the following challenges:
dns-01 challenge for obu4alka.ru

- - - - - - - - - - - - - - - - - - - - - - - - - - - - - - - - - - - - - - - -
NOTE: The IP of this machine will be publicly logged as having requested this
certificate. If you're running certbot in manual mode on a machine that is not
your server, please ensure you're okay with that.

Are you OK with your IP being logged?
- - - - - - - - - - - - - - - - - - - - - - - - - - - - - - - - - - - - - - - -
(Y)es/(N)o:
В данном сообщении нас предупреждают о том, что наш IP адрес на котором расположен наш сайт будет записан у разработчиков. Нажимаем «Y«
Please deploy a DNS TXT record under the name
_acme-challenge.obu4alka.ru with the following value:

3yTQ7zcagxbrWLdLI4Jp8wA_VarDKkAt7RqCOwjugaE

Before continuing, verify the record is deployed.
- - - - - - - - - - - - - - - - - - - - - - - - - - - - - - - - - - - - - - - -
Press Enter to Continue
Захожу в панель хостера — выбираю мой домен — управление доменом — Управление зоной ДНС
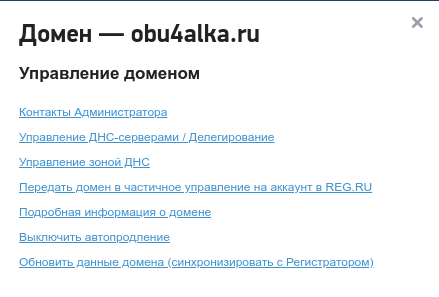
Добавляю информацию о TXT записи (это что выдал мне certbot).
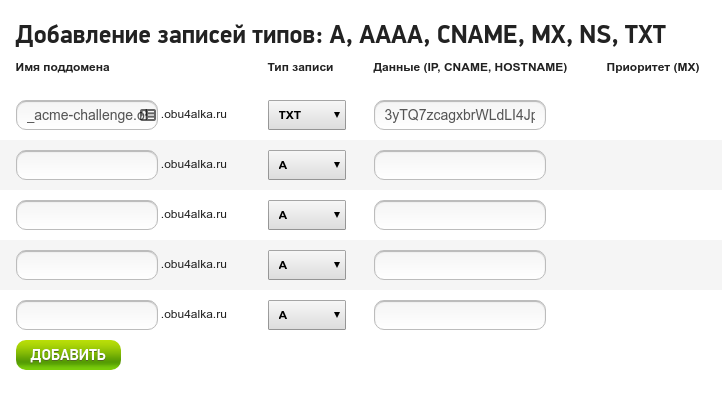
За одно добавляю информацию о поддомене третьего уровня:
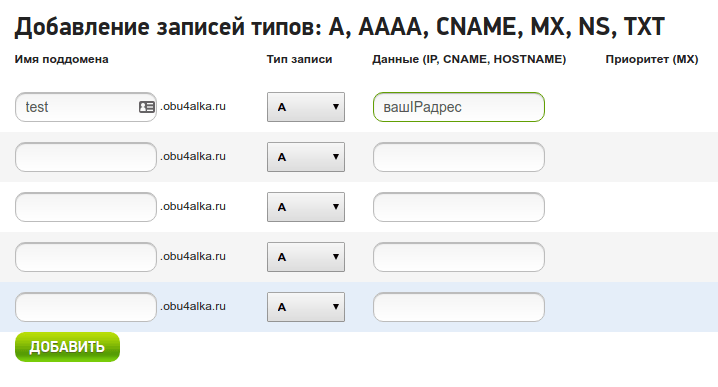
После внесения всех изменений в ваш домен необходимо будет немного подождать. Чтобы записи обновились у регистратора.
Если все прошло удачно, то вводим следующие команды для получения wildcard сертификата:
sudo certbot --manual --agree-tos --manual-public-ip-logging-ok --preferred-challenges dns certonly --server https://acme-v02.api.letsencrypt.org/directory -d *.obu4alka.ru -d obu4alka.ruПроходим все этапы заново и получаем наш сертификат.
Также давайте проверим что запись действительно обновилась. Для этого в терминале набираем следующую команду:
dig -t txt _acme-challenge.obu4alka.ruили можно проверить например google DNS-ом:
dig @8.8.8.8 -t txt _acme-challenge.obu4alka.ruЕсли запись обновилась, то двигаемся дальше. Так, как бот запрашивал нажатия «ENTER» после всех манипуляций, то жмем.
Waiting for verification...
Cleaning up challenges
Obtaining a new certificate
IMPORTANT NOTES:
 - Congratulations! Your certificate and chain have been saved at:
   /etc/letsencrypt/live/obu4alka.ru-0001/fullchain.pem
   Your key file has been saved at:
   /etc/letsencrypt/live/obu4alka.ru-0001/privkey.pem
   Your cert will expire on 2020-07-10. To obtain a new or tweaked
   version of this certificate in the future, simply run certbot
   again. To non-interactively renew *all* of your certificates, run
   "certbot renew"
 - If you like Certbot, please consider supporting our work by:

   Donating to ISRG / Let's Encrypt:   https://letsencrypt.org/donate
   Donating to EFF:                    https://eff.org/donate-le
Ну вот WildCard сертификат был получен.
Теперь необходимо внести изменения в конфигурационный файл nginx. Для этого открываем его (у вас название и пути могут отличаться):
sudo nano /etc/nginx/site-available/obu4alka-ssl.confМеняем директории для записей с ssl сертификатами, а также опцию server_name.
server_name obu4alka.ru *.obu4alka.ru;

...

ssl_certificate /etc/letsencrypt/live/obu4alka.ru-0001/fullchain.pem;
ssl_trusted_certificate /etc/letsencrypt/live/obu4alka.ru-0001/fullchain.pem;
ssl_certificate_key /etc/letsencrypt/live/obu4alka.ru-0001/privkey.pem;
Проверяем все ли в порядке с настройкой nginx:
nginx -tЕсли все в порядке, то перезагружаем nginx:
sudo /etc/init.d/nginx restartТеперь Nginx настроен на обработку поддоменов третьего уровня с WildCard сертификатом.
Ошибка при обновлении сертификата wildcard от Let`s Encrypt
При обновлении wildcard сертификата certbot категарически не хотел обновлять данные сертификаты. Терминал выдал мне следующее:
All renewal attempts failed. The following certs could not be renewed:
  /etc/letsencrypt/live/obu4alka.ru-0001/fullchain.pem (failure)
  /etc/letsencrypt/live/obu4alka.ru-0002/fullchain.pem (failure)
- - - - - - - - - - - - - - - - - - - - - - - - - - - - - - - - - - - - - - - -
2 renew failure(s), 0 parse failure(s)
Решение было найдено после 4 часов изучение интернета. Опишу все процедуры к которым я прибегал. Может кому помогут.
- Первое: В директории
/etc/letsencrypt/renewalнаходим наш домен и меняем строчкуauthenticator.
sudo nano /etc/letsencrypt/renewal/obu4alka.ru-0001.conf#authenticator = manual # было
authenticator = nginx # стало- Второе: В директории
/etc/nginx/site-availableнаходим наш конфигурационный файл от домена и смотрим чтобы был прописан IP-адрес перед портами 80 и 443 - Третье: После долгих мучений (первые два варианта не помогли) я решил удалить конфиги и директории на сертификаты от certbot. И так переходим в директорию
/etc/letsencrypt/liveи удаляем все каталоги нашего домена. Также поступаем с директорией/etc/letsencrypt/archiveи/etc/letsencrypt/renewal. А далее переходим к созданию сертификата заново.
Настройка автопродления сертификатов
Тут всё просто, точнее даже очень просто.
Создаем исполняемый bash скрипт и открываем на редактирование:
sudo touch /etc/cron.weekly/cert-nginx && sudo chmod +x /etc/cron.weekly/cert-nginx && sudo nano /etc/cron.weekly/cert-nginx#!/bin/bash
/usr/bin/certbot renew --post-hook "service nginx reload"В результате каждую неделю скрипт будет запускаться и проверять необходимость обновления сертификатов. В случае такой необходимости сертификаты автоматически будут обновлены и будет запущен хук обновляющий конфигурацию сервера nginx (в моём случае)
Если есть вопросы, то пишем в комментариях.
Добавление RSS-ленты на главную страницу этого сайта не поддерживается, так как это может привести к зацикливанию, замедляющему работу вашего сайта. Попробуйте использовать другой блок, например блок Последние записи, для отображения записей сайта.
Если вы обнаружили орфографическую ошибку, пожалуйста, сообщите нам, выделив текст и нажав на него.
5
2
голоса
Setup Pre-requisites
If you already have a droplet or a system then make sure your system has Python 2.7 or 3 and git installed on it. As I am starting on fresh Ubuntu droplet, we have to set up the above pre-requisites.
apt-get updateapt-get install python-minimalpython --versionapt-get install git-coregit --version
Setup Certbot
After setting up the pre-requisites, now will setup the Certbot via Github.
While installing the Certbot, I came across the error
Traceback (most recent call last): File "/usr/lib/python3/dist-packages/virtualenv.py", line 2363, in main() File "/usr/lib/python3/dist-packages/virtualenv.py", line 719, in main symlink=options.symlink) File "/usr/lib/python3/dist-packages/virtualenv.py", line 988, in create_environment download=download, File "/usr/lib/python3/dist-packages/virtualenv.py", line 918, in install_wheel call_subprocess(cmd, show_stdout=False, extra_env=env, stdin=SCRIPT) File "/usr/lib/python3/dist-packages/virtualenv.py", line 812, in call_subprocess % (cmd_desc, proc.returncode))OSError: Command /opt/eff.org/certbot/venv/bin/python2.7 - setuptools pkg_resources pip wheel failed with error code
After googling, I came to know, the error triggered due to improper locale variables. Set the locale variables and re-run.
export LC_ALL="en_US.UTF-8"export LC_CTYPE="en_US.UTF-8"
You can also install the Certbot via the apt installer.
apt-get install letsencrypt
Generate The Wildcard SSL Certificate
Now with the help of Certbot will generate wildcard certificate for our test domain erpnext.xyz
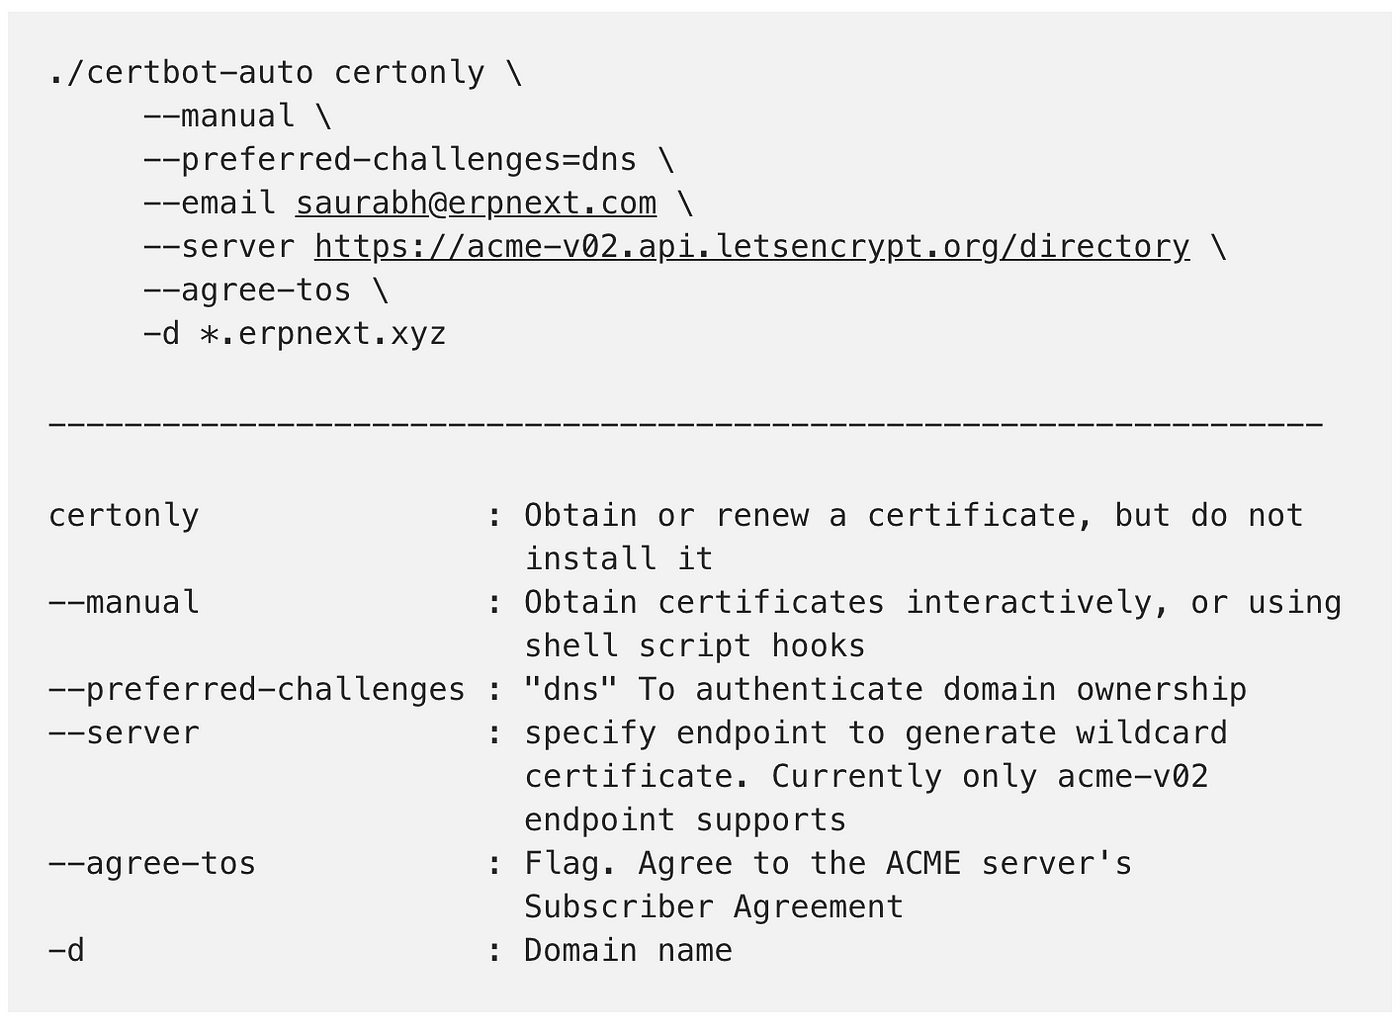
Note: As we are generating wildcard ssl certificate, mention domain with * i.e. *.erpnext.xyz
Authenticate The Domain’s Ownership
For wildcard certificates, the only challenge method Let’s Encrypt accepts is the DNS challenge, which we can invoke via the preferred-challenges=dns flag.
After executing the above command, the Certbot will share a text record to add to your DNS.
Record Name: _acme-challengeRecord Value: J50GNXkhGmKCfn-0LQJcknVGtPEAQ_U_WajcLXgqWqo
Create TXT record via DNS console and setup key and value

Get The Certificate
Once you authenticate the domain ownership; by cleaning up dns challenges, Certbot generates the ssl certificate and required keys.
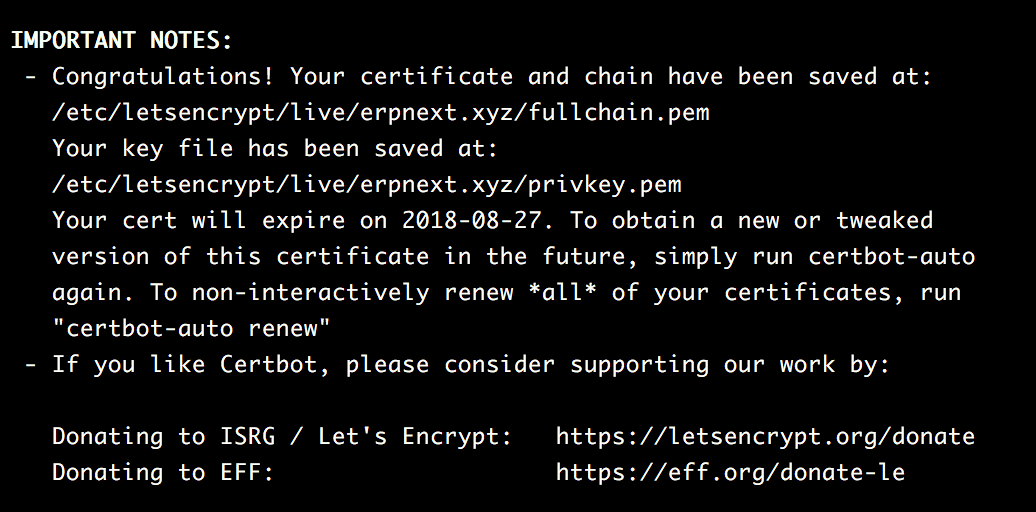
Congratulations!!! You have successfully generated wildcard SSL certificate for your domain.
Basics
SSL Certificates are small data files that digitally bind a cryptographic key to an organisation’s details. When installed on a web server, it activates the padlock and the https protocol and allows secure connections from a web server to a browser. Commonly, SSL is used to secure credit card transactions, data transfer and logins, and more recently is becoming the norm when securing browsing of social media sites.
Note: As of August 2020 most browsers will no longer display the green padlock and address bar to indicate Extended Validation.
When a certificate is successfully installed on your server, the application protocol (also known as HTTP) will change to HTTPS, where the ‘S’ stands for ‘secure’.
Generating The Wildcard SSL Certificate using certbot cli
At this stage you should have your certbot cli installed.
expected output:
IMPORTANT NOTES: - Congratulations! Your certificate and chain have been saved at: /etc/letsencrypt/live/domain.com/fullchain.pem Your key file has been saved at: /etc/letsencrypt/live/domain.com/privkey.pem Your cert will expire on 2020-09-06. To obtain a new or tweaked version of this certificate in the future, simply run certbot again. To non-interactively renew *all* of your certificates, run "certbot renew"
During the execution you will be prompt to create TXT record inside Route53 which you can see demonstrated below:
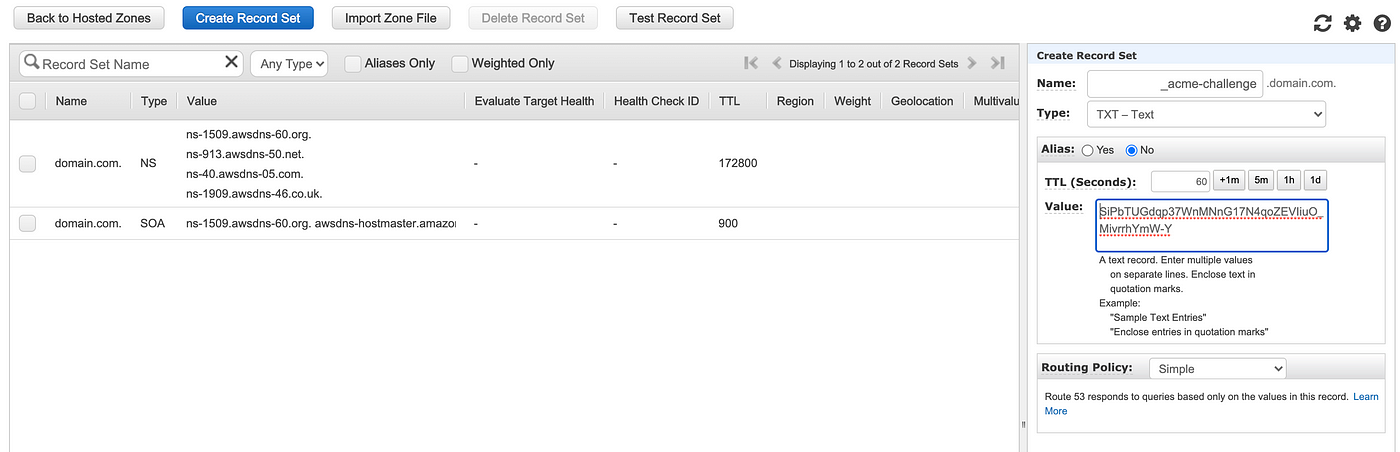
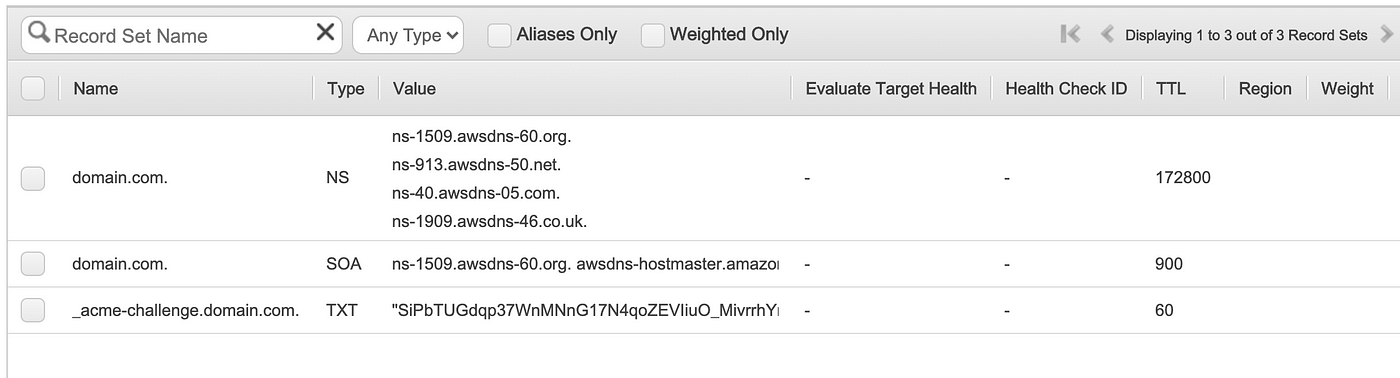
Once you have that record in place, press enter to continue and you will get a desired output presented above.
More above folder structure and naming
All generated keys and issued certificates can be found in /etc/letsencrypt/live/${domain}. In the case of creating a SAN certificate with multiple alternative names, ${domain} is the first domain passed in via -d parameter. Rather than copying, please point your (web) server configuration directly to those files (or create symlinks). During the renewal, /etc/letsencrypt/live is updated with the latest necessary files.
For historical reasons, the containing directories are created with permissions of 0700 meaning that certificates are accessible only to servers that run as the root user. If you will never downgrade to an older version of Certbot, then you can safely fix this using chmod 0755 /etc/letsencrypt/{live,archive}.
For servers that drop root privileges before attempting to read the private key file, you will also need to use chgrp and chmod 0640 to allow the server to read /etc/letsencrypt/live/$domain/privkey.pem.
Available files for each certificate
Inside that folder you will find following files:
privkey.pem — private key for the certificate.
fullchain.pem — All certificates, including server certificate (aka leaf certificate or end-entity certificate). The server certificate is the first one in this file, followed by any intermediates.
cert.pem and chain.pem — cert.pem contains the server certificate by itself, and chain.pem contains the additional intermediate certificate or certificates that web browsers will need in order to validate the server certificate. If you provide one of these files to your web server, you must provide both of them, or some browsers will show “This Connection is Untrusted” errors for your site, some of the time.
Verify validity of SSL Certificates generated by Certbot
To do that you can run the following command:
sudo certbot certificates
which will generate following output:
Note that in my output above, I have three wildcard SSL certificates for three different domains.
Uploading certs to AWS ACM
Assuming you have all the files available for your generated SSL certificate, you can make use of AWS CLI to import your certificate to ACM.
aws --region eu-west-1 acm import-certificate \--certificate "/etc/letsencrypt/live/domain.com/cert.pem" \--private-key "/etc/letsencrypt/live/domain.com/privkey.pem" \--certificate-chain "/etc/letsencrypt/live/domain.com/fullchain.pem"
Obtaining wildcard ssl certificate from Let’s Encrypt
Note:- Replace example.com with your domain name
Deploy a DNS TXT record provided by Let’s Encrypt certbot after running the above command
Configuring Nginx to serve wildcard subdomains
- Create a config file
sudo touch /etc/nginx/sites-available/example.com - Open the file
sudo vi /etc/nginx/sites-available/example.com - Add the following code in the file
ssl_certificate /etc/letsencrypt/live/example.com/fullchain.pem; ssl_certificate_key /etc/letsencrypt/live/example.com/privkey.pem; include /etc/letsencrypt/options-ssl-nginx.conf; ssl_dhparam /etc/letsencrypt/ssl-dhparams.pem;
Note:- Replace example.com with your domain name.
Есть доступ по SSH?
Большинству людей с доступом по SSH мы рекомендуем использовать ACME-клиент Certbot. Он автоматизирует выпуск и установку сертификата без перерыва в работе. В нем также есть экспертные режимы для людей, которые не хотят использовать автоматические настройки. Он прост в использовании, работает на большинстве операционных систем, и отлично документирован. Посетите сайт Certbot для получения инструкций по настройке вашей операционной системы и веб-сервера.
Если Certbot вас не устраивает, или вы хотите попробовать что-то другое, есть много других ACME-клиентов на выбор. После того как вы выбрали программное обеспечение клиента ACME, посмотрите документацию для этого клиента.
Если вы экспериментируете с различными ACME-клиентами, используйте наше тестовое окружение, чтобы избежать ограничений в скорости.
Нет доступа по SSH?
Лучший способ использовать Let’s Encrypt без SSH — использовать встроенную поддержку от вашего хостинг-провайдера. Если ваш хостинг-провайдер предлагает поддержку Let’s Encrypt, он может запросить бесплатный сертификат от вашего имени, установить его и обновлять автоматически. Для некоторых хостинг-провайдеров этот параметр настроек необходимо включить. Другие провайдеры автоматически запрашивают и устанавливают сертификаты для всех своих клиентов.
Проверьте наш список хостинг-провайдеров, чтобы посмотреть, есть ли в нём ваш. Если есть, то следуйте их документации, чтобы настроить сертификат Let’s Encrypt.
Если ваш хостинг-провайдер не поддерживает Let’s Encrypt, вы можете связаться с ним и запросить поддержку. Мы делаем все возможное, чтобы добавить поддержку Let’s Encrypt было очень просто, и провайдеры часто рады услышать предложения от своих клиентов!
Возможно, компания-хостер не заинтересована во взаимодействии с Let’s Encrypt, но позволяет загружать сертификаты вручную. Установите Certbot на ваш компьютер для запуска в ручном режиме. В ручном режиме загрузите специальный файл на ваш сайт, чтобы подтвердить факт владения. Certbot создаст сертификат, который вы можете загрузить на сервер хостинг-провайдера. Мы не рекомендуем этот способ из-за его трудоёмкости, а также повторения рутинных действий по перевыпуску сертификата несколько раз в год. Для большинства людей легче будет запросить у хостинг-провайдера поддержку Let’s Encrypt, или же перейти к другому провайдеру, если он не планирует это реализовывать.
With Shell Access
We recommend that most people with shell access use the
Certbot ACME client. It can automate certificate issuance and installation with no downtime.
It also has expert modes for people who don’t want autoconfiguration. It’s easy to use,
works on many operating systems, and has great documentation. Visit the
Certbot site to get customized instructions for your operating system and web server.
If Certbot does not meet your needs, or you’d like to try something else, there are
many more ACME clients to choose from. Once you’ve chosen ACME client
software, see the documentation for that client to proceed.
If you’re experimenting with different ACME clients, use our
staging environment to avoid hitting
rate limits.
Without Shell Access
The best way to use Let’s Encrypt without shell access is by using built-in support
from your hosting provider. If your hosting provider offers Let’s Encrypt
support, they can request a free certificate on your behalf, install it, and
keep it up-to-date automatically. For some hosting providers, this is a
configuration setting you need to turn on. Other providers automatically
request and install certificates for all their customers.
Check our list of hosting providers
to see if yours is on it. If so, follow their documentation to set up your
Let’s Encrypt certificate.
If your hosting provider does not support Let’s Encrypt, you can contact them to
request support. We do our best to make it very easy to add Let’s Encrypt
support, and providers are often happy to hear suggestions from customers!
If your hosting provider doesn’t want to integrate Let’s Encrypt, but does
support uploading custom certificates, you can install Certbot on your own
computer and use it in manual mode.
In manual mode, you upload a specific file to your website to prove your
control. Certbot will then retrieve a certificate that you can upload to your
hosting provider. We don’t recommend this option because it is time-consuming
and you will need to repeat it several times per year as your certificate
expires. For most people it is better to request Let’s Encrypt support from your
hosting provider, or switch providers if they do not plan to implement it.
Prerequisites
This tutorial assumes you already have the following:
- The Certbot utility installed, version
0.22.0or later. If you need help installing Certbot, please visit ourLet's Encrypttag page, where you can find installation guides for a variety of Linux distributions and servers. Some common setups are listed below:- How To Secure Nginx with Let’s Encrypt on Ubuntu 20.04
- How To Secure Apache with Let’s Encrypt on Ubuntu 20.04
- How To Use Certbot Standalone Mode to Retrieve Let’s Encrypt SSL Certificates on Ubuntu 18.04
- A domain name, and a DNS provider that is supported by Certbot. See Certbot’s DNS plugin list for a list of supported providers
Let’s begin by setting up and testing our DNS records.
Step 1 — Setting up Wildcard DNS
Before we fetch our wildcard SSL certificate, we should make sure our server is responding to requests on multiple subdomains. This will typically be accomplished by setting up a wildcard DNS record, which looks similar to this:
*.example.com. 3600 IN A 203.0.113.1
The * wildcard character is treated as a stand-in for any hostname. This example DNS record would match one.example.com, and two.example.com. It would not match the bare example.com nor would it match one.two.example.com because the * wildcard will only expand to one hostname, not to multiple levels of names.
Additionally a wildcard DNS record can only have one wildcard character, so *.*.example.com is not allowed.
Please refer to your DNS provider’s documentation to set up the correct DNS entries. You will want to add either an A or CNAME wildcard record before proceeding.
To test that your wildcard DNS is working as intended, use the host command to query a few hostnames:
- one.example.com
Be sure to substitute your own domain and hostname above. Also, remember that it sometimes takes a few minutes for DNS records to propagate through the system. If you just added your DNS record and are getting errors, wait a few minutes and try again.
When the hostname you entered resolves properly, you’ll output similar to the following:
one.example.com has address 203.0.113.1
Otherwise, you’ll see an NXDOMAIN error:
Host one.example.com not found: 3(NXDOMAIN)
Once you’ve verified that multiple subdomains are resolving to your server, you can continue on to the next step, where you’ll configure Certbot to connect to your DNS provider.
Step 2 — Installing the Correct Certbot DNS Plugin
Before issuing certificates, Let’s Encrypt performs a challenge to verify that you control the hosts you’re requesting certificates for. In the case of a wildcard certificate, we need to prove that we control the entire domain. We do this by responding to a DNS-based challenge, where Certbot answers the challenge by creating a special DNS record in the target domain. Let’s Encrypt’s servers then verify this record before issuing the certificate.
In order to connect to your DNS provider, Certbot needs a plugin. Please see Certbot’s DNS plugin list to get the name of the appropriate plugin for your DNS provider.
For instance, the DigitalOcean provider is called certbot-dns-digitalocean. We can install the certbot-dns-digitalocean plugin on Ubuntu and Debian by installing the following package:
- python3-certbot-dns-digitalocean
Other plugins should follow the same naming format. Swap your provider’s name into the command above if you’re using a different service.
On CentOS and other RPM-based distributions the installation command may be dnf:
- dnf python3-certbot-dns-digitalocean
Or yum:
- yum python3-certbot-dns-digitalocean
You also may need to install additional package repositories on these distributions to get access to the Certbot plugin packages.
To verify that the plugin was installed correctly, you can ask Certbot to list its current plugins:
- certbot plugins
- - - - - - - - - - - - - - - - - - - - - - - - - - - - - - - - - - - - - - - -
* dns-digitalocean
Description: Obtain certs using a DNS TXT record (if you are using DigitalOcean
for DNS).
Interfaces: IAuthenticator, IPlugin
Entry point: dns-digitalocean =
certbot_dns_digitalocean.dns_digitalocean:Authenticator

* standalone
Description: Spin up a temporary webserver
Interfaces: IAuthenticator, IPlugin
Entry point: standalone = certbot.plugins.standalone:Authenticator

* webroot
Description: Place files in webroot directory
Interfaces: IAuthenticator, IPlugin
Entry point: webroot = certbot.plugins.webroot:Authenticator
- - - - - - - - - - - - - - - - - - - - - - - - - - - - - - - - - - - - - - - -
In the above output, the dns-digitalocean plugin is listed first, along with the default standalone and webroot plugins.
When you have verified that the correct plugin is installed, continue on to the next step to configure it.
Step 3 — Configuring the Certbot Plugin
Because Certbot needs to connect to your DNS provider and create DNS records on your behalf, you’ll need to give it permission to do so. This involves getting an API token or other authentication information from your DNS provider, and putting it in a secure credentials file that Certbot will later read from.
Because each provider has a different authentication process, please refer to the documentation for your particular Certbot DNS plugin for more information on what tokens or keys you’ll need to obtain.
For this example, we will continue using the dns-digitalocean plugin, and will store our credentials in the file ~/certbot-creds.ini.
We will create this file using the nano text editor:
- ~/certbot-creds.ini
This will open up a new blank text file. You’ll want to add your information based on the instructions for your particular DNS provider. DigitalOcean requires a single API token, so it will look like this:
~/certbot-creds.ini
dns_digitalocean_token = 235dea9d8856f5b0df87af5edc7b4491a92745ef617073f3ed8820b5a10c80d2
Be sure to replace the example token above with your own information.
Save and close the file. If you’re using nano, type CTRL+O (for “write out”), hit ENTER, then CTRL+X to exit.
After creating the file, you will need to restrict its permissions so that your secret is not leaked to other users. The following chmod command will give read and write access to only your user:
- ~/certbot-creds.ini
Once you’ve set up your credentials file, you’re ready to actually request the certificate.
Step 4 — Retrieving the Certificate
At this point, retrieving your Let’s Encrypt wildcard certificate is similar to “normal” non-wildcard certificates. The main changes to the process are to specify the DNS-based challenge, and point to our DNS credentials file. Additionally we’ll use a wildcard domain with the -d flag:
- certbot certonly
- --dns-digitalocean
- --dns-digitalocean-credentials ~/certbot-creds.ini
Note that you cannot use the —nginx or —apache plugins to automatically configure those servers with a wildcard certificate. We use the certonly command instead, to only download the certificate.
When running the above command, you may be presented with a few questions to answer if this is your first time running Certbot. After answering them, Cerbot will perform the challenge, the Let’s Encrypt servers will verify it, and your new certificate will be downloaded and saved to /etc/letsencrypt/. You should see output similar to the following:
IMPORTANT NOTES:
 - Congratulations! Your certificate and chain have been saved at:
   /etc/letsencrypt/live/example.com/fullchain.pem
   Your key file has been saved at:
   /etc/letsencrypt/live/example.com/privkey.pem
   Your cert will expire on 2021-09-27. To obtain a new or tweaked
   version of this certificate in the future, simply run certbot
   again. To non-interactively renew *all* of your certificates, run
   "certbot renew"
 - If you like Certbot, please consider supporting our work by:

   Donating to ISRG / Let's Encrypt:   https://letsencrypt.org/donate
   Donating to EFF:                    https://eff.org/donate-le
You have successfully generated a wildcard SSL certificate! Your next step is to configure your server application to use it. We’ll link to some resources that can help with this in the next section.
Conclusion
In this tutorial you configured Certbot and downloaded a wildcard SSL certificate from the Let’s Encrypt certificate authority. You are now ready to configure your server software to use this certificate to secure its connections.
For more information on what certificate files were downloaded, and how to handle gracefully restarting your applications when Certbot automatically updates your certificates, take a look at Steps 3 and 4 of our tutorial How To Use Certbot Standalone Mode to Retrieve Let’s Encrypt SSL Certificates on Ubuntu 18.04.
Prerequisites
To complete this tutorial, you’ll need the following:
- One CentOS 7 server set up by following the CentOS 7 initial server setup guide, including a sudo non-root user and a firewall.
- A fully registered domain name. You can purchase a domain name on Namecheap, get one for free on Freenom, or use the domain registrar of your choice.
- A Cloudflare account.
- A DNS record set up for your domain in Cloudflare’s DNS, along with a couple of subdomains configured. You can follow CloudFlare’s tutorial on setting up a web site to configure this.
Step 1 — Installing Certbot
The certbot package is not available through CentOS’s package manager by default. You will need to enable the EPEL repository to install Certbot and its plugins.
To add the CentOS 7 EPEL repository, run the following command:
- yum -y epel-release
Once the installation completes, you can install certbot:
- yum -y certbot
And then install the CloudFlare plugin for Certbot:
- yum -y python2-cloudflare python2-certbot-dns-cloudflare
If you are using another DNS service, you can find the corresponding plugin using the yum search command:
- yum search python2-certbot-dns
You’ve prepared your server to obtain certificates. Now you need to get the API key from CloudFlare.
Step 2 — Getting the CloudFlare API
In order for Certbot to automatically renew wildcard certificates, you need to provide it with your CloudFlare login and API key.
Log in to your Cloudflare account and navigate to the Profile page.
Click the View button in the Global API Key line.

For security reasons, you will be asked to re-enter your Cloudflare account password. Enter it and validate the CAPTCHA. Then click the View button again. You’ll see your API key:

Copy this key. You will use it in the next step.
Now return to your server to continue the process of obtaining the certificate.
Step 3 — Configuring Certbot
You have all of the necessary information to tell Certbot how to use Cloudflare, but let’s write it to a configuration file so that Сertbot can use it automatically.
First run the certbot command without any parameters to create the initial configuration file:
- certbot
Next create a configuration file in the /etc/letsencrypt directory which will contain your CloudFlare email and API key:
- /etc/letsencrypt/cloudflareapi.cfg
Add the following into it, replacing the placeholders with your Cloudflare login and API key:
/etc/letsencrypt/cloudflareapi.cfg
dns_cloudflare_email = your_cloudflare_login
dns_cloudflare_api_key = your_cloudflare_api_key
Save the file and exit the editor.
With Cloudflare’s API key, you can do the same things from the command line that you can do from the Cloudflare UI, so in order to protect your account, make the configuration file readable only by its owner so nobody else can obtain your key:
- /etc/letsencrypt/cloudflareapi.cfg
With the configuration files in place, let’s obtain a certificate.
Step 4 — Obtaining the Certificate
To obtain a certificate, we’ll use the certbot command and specify the plugin we want, the credentials file we want to use, and the server we should use to handle the request. By default, Certbot uses Let’s Encrypt’s production servers, which use ACME API version 1, but Certbot uses another protocol for obtaining wildcard certificates, so you need to provide an ACME v2 endpoint.
Run the following command to obtain the wildcard certificate for your domain:
- certbot certonly --cert-name your_domain --dns-cloudflare --dns-cloudflare-credentials /etc/letsencrypt/cloudflareapi.cfg --server https://acme-v02.api.letsencrypt.org/directory -d -d your_domain
You will be asked to specify the email address that should receive urgent renewal and security notices:
...
Plugins selected: Authenticator dns-cloudflare, Installer None
Enter email address (used for urgent renewal and security notices) (Enter 'c' to
cancel): your email
Then you’ll be asked to agree to the Terms of Service:
-------------------------------------------------------------------------------
Please read the Terms of Service at
https://letsencrypt.org/documents/LE-SA-v1.2-November-15-2017.pdf. You must
agree in order to register with the ACME server at
https://acme-v02.api.letsencrypt.org/directory
-------------------------------------------------------------------------------
(A)gree/(C)ancel: A
Then you’ll be asked to share your email address with the Electronic Frontier
Foundation:
-------------------------------------------------------------------------------
Would you be willing to share your email address with the Electronic Frontier
Foundation, a founding partner of the Let's Encrypt project and the non-profit
organization that develops Certbot? We'd like to send you email about EFF and
our work to encrypt the web, protect its users and defend digital rights.
-------------------------------------------------------------------------------
(Y)es/(N)o: N
Then Certbot will obtain your certificates. You will see the following message:
IMPORTANT NOTES:
 - Congratulations! Your certificate and chain have been saved at:
   /etc/letsencrypt/live/your_domain/fullchain.pem
   Your key file has been saved at:
   /etc/letsencrypt/live/your_domain/privkey.pem
   Your cert will expire on 2018-07-31. To obtain a new or tweaked
   version of this certificate in the future, simply run certbot
   again. To non-interactively renew *all* of your certificates, run
   "certbot renew"
 - Your account credentials have been saved in your Certbot
   configuration directory at /etc/letsencrypt. You should make a
   secure backup of this folder now. This configuration directory will
   also contain certificates and private keys obtained by Certbot so
   making regular backups of this folder is ideal.
 - If you like Certbot, please consider supporting our work by:

   Donating to ISRG / Let's Encrypt:   https://letsencrypt.org/donate
   Donating to EFF:                    https://eff.org/donate-le
Now you have your wildcard certificate. Let’s take a look at what Certbot has downloaded for you. Use the ls command to see the contents of the directory that holds your keys and certificates:
- /etc/letsencrypt/live/your_domain
cert.pem chain.pem fullchain.pem privkey.pem README
The README file contains information about these files:
$ cat /etc/letsencrypt/live/your_domain/README
You’ll see output like this:
README
This directory contains your keys and certificates.

`privkey.pem`  : the private key for your certificate.
`fullchain.pem`: the certificate file used in most server software.
`chain.pem`    : used for OCSP stapling in Nginx >=1.3.7.
`cert.pem`     : will break many server configurations, and should not be used
                 without reading further documentation (see link below).

We recommend not moving these files. For more information, see the Certbot
User Guide at https://certbot.eff.org/docs/using.html#where-are-my-certificates.
From here, you can configure your servers with the wildcard certificate. You’ll usually only need two of these files: fullchain.pem and privkey.pem.
For example, you can configure several web-based services:
- wwww.example.com
- api.example.com
- mail.example.com
To do this, you will need a web server, such as Apache or Nginx. The installation and configuration of these servers is beyond the scope of this tutorial, but the following guides will walk you through all the necessary steps to configure the servers and apply your certificates.
For Nginx, take a look at these tutorials:
- How To Install Nginx on CentOS 7
- How To Set Up Nginx Server Blocks on CentOS 7
- Configure Nginx to Use SSL
For Apache, consult these tutorials:
- How To Install Apache On CentOS 7
- How To Set Up Apache Virtual Hosts on CentOS 7
- How To Create an SSL Certificate on Apache for CentOS 7
Now let’s look at renewing the certificates automatically.
Step 5 — Renewing certificates
Let’s Encrypt issues short-lived certificates which are valid for 90 days. We’ll need to set up a cron task to check for expiring certificates and renew them automatically.
Let’s create a cron task
which will run the renewal check daily.
Use the following command to open the crontab file for editing:
Add the following line to the file to attempt to renew the certificates daily:
crontab
30 2 * * * certbot renew --noninteractive
30 2 * * *means “run the following command at 2:30 am, every day”.- The
certbot renewcommand will check all certificates installed on the system and update any that are set to expire in less than thirty days. --noninteractivetells Certbot not to wait for user input.
You will need to reload your web server after updating your certificates. The renew command includes hooks for running commands or scripts before or after a certificate is renewed. You can also configure these hooks in the renewal configuration file for your domain.
For example, to reload your Nginx server, open the renewal configuration file:
- /etc/letsencrypt/renewal/your_domain.conf
Then add the following line under the [renewalparams] section:
/etc/letsencrypt/renewal/<^>your_domain<^>.conf
renew_hook = systemctl reload nginx
Now Certbot will automatically restart your web server after installing the updated certificate.
Установка certbot — клиента Let’s Encrypt в Linux
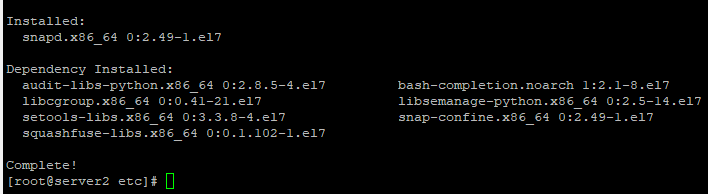
Выпускать сертификат Let’s Encrypt мы будем с помощью certbot. Для установка бота, нужно воспользоваться утилитой snapd, если у вас ее нет, установите ее:
# yum install snapd -y
После установки snapd, его нужно добавить, как сервис и создать симлинк для удобства запуска:
# systemctl enable —now snapd.socket# ln -s /var/lib/snapd/snap /snap
Теперь можно установить certbot:
# sudo snap install —classic certbot
Все также для удобства запуска, создадим симлинк:
# ln -s /snap/bin/certbot /usr/bin/certbot
Выпуск SSL сертификата для Nginx
Чтобы выпустить SSL сертификат для сайта, запустите команду:
# certbot certonly —nginx
Утилита проверит конфигурацию nginx и выдаст все сайты на которые можно установить сертификат (утилита получает список сайтов из конфигурации nginx). В процессе бот будет запрашивать у вас данные, email, домены и тд.

В моем случае домен один и я выбрал его. Если у вас нет проблем с DNS-записями домена и веб-сервером, то SSL сертификат должен выпуститься без ошибок.
Установка SSL сертификата Let’s Encrypt на веб-сайт Nginx
Чтобы SSL сертификат Let’s Encrypt заработал на вашем сайте, нужно использовать следующий конфигурационный файл nginx для вашего домена:
server {
  listen 443 ssl http2;
  server_name lets.build-centos.ru;
  root /var/www/lets.build-centos.ru;
  index index.php index.html index.htm;
  access_log /var/www/build-centos.info/log/ssl-access.log main;
  error_log /var/www/build-centos.info/log/ssl-error.log;
  keepalive_timeout 60;
  ssl_certificate /etc/letsencrypt/live/build-centos.info/fullchain.pem;
  ssl_certificate_key /etc/letsencrypt/live/build-centos.info/privkey.pem;
  ssl_protocols TLSv1 TLSv1.1 TLSv1.2;
  ssl_ciphers 'ECDHE-RSA-AES128-GCM-SHA256:ECDHE-ECDSA-AES128-GCM-SHA256:ECDHE-RSA-AES256-GCM-SHA384:ECDHE-ECDSA-AES256-GCM-SHA384:DHE-RSA-AES128-GCM-SHA256:DHE-DSS-AES128-GCM-SHA256:kEDH+AESGCM:ECDHE-RSA-AES128-SHA256:ECDHE-ECDSA-AES128-SHA256:ECDHE-RSA-AES128-SHA:ECDHE-ECDSA-AES128-SHA:ECDHE-RSA-AES256-SHA384:ECDHE-ECDSA-AES256-SHA384:ECDHE-RSA-AES256-SHA:ECDHE-ECDSA-AES256-SHA:DHE-RSA-AES128-SHA256:DHE-RSA-AES128-SHA:DHE-DSS-AES128-SHA256:DHE-RSA-AES256-SHA256:DHE-DSS-AES256-SHA:DHE-RSA-AES256-SHA:AES128-GCM-SHA256:AES256-GCM-SHA384:AES128-SHA256:AES256-SHA256:AES128-SHA:AES256-SHA:AES:CAMELLIA:DES-CBC3-SHA:!aNULL:!eNULL:!EXPORT:!DES:!RC4:!MD5:!PSK:!aECDH:!EDH-DSS-DES-CBC3-SHA:!EDH-RSA-DES-CBC3-SHA:!KRB5-DES-CBC3-SHA';
  add_header Strict-Transport-Security 'max-age=604800';
  location / {
    try_files $uri $uri/ /index.php?$args;
  }
  location ~* ^.+.(js|css|png|jpg|jpeg|gif|ico|woff)$ {
    access_log off;
    expires max;
  }
  location ~ \.php$ {
  try_files $uri =404;
  fastcgi_pass unix:/var/run/php-fpm/php-fpm.sock;
  fastcgi_index index.php;
  fastcgi_param DOCUMENT_ROOT /var/www/lets.build-centos.ru;
  fastcgi_param SCRIPT_FILENAME /var/www/lets.build-centos.ru/$fastcgi_script_name;
  fastcgi_param PATH_TRANSLATED /var/www/lets.build-centos.ru/$fastcgi_script_name;
  include fastcgi_params;
  fastcgi_param QUERY_STRING $query_string;
  fastcgi_param REQUEST_METHOD $request_method;
  fastcgi_param CONTENT_TYPE $content_type;
  fastcgi_param CONTENT_LENGTH $content_length;
  fastcgi_param HTTPS on;
  fastcgi_intercept_errors on;
  fastcgi_ignore_client_abort off;
  fastcgi_connect_timeout 60;
  fastcgi_send_timeout 180;
  fastcgi_read_timeout 180;
  fastcgi_buffer_size 128k;
  fastcgi_buffers 4 256k;
  fastcgi_busy_buffers_size 256k;
  fastcgi_temp_file_write_size 256k;
  }
    location = /favicon.ico {
    log_not_found off;
    access_log off;
  }
  location = /robots.txt {
    allow all;
    log_not_found off;
    access_log off;
  }
  location ~ /\.ht {
    deny all;
  }
 }
Сохраните конфигурационный файл. Выполняем проверку валидности настроек в конфигурационном файле nginx:
[root@server letsencrypt]# nginx -t
nginx: the configuration file /etc/nginx/nginx.conf syntax is ok
nginx: configuration file /etc/nginx/nginx.conf test is successful
Перезапустите веб-сервер nginx:
# service nginx restart
Теперь, если открыть в браузере сайт по протоколу https, высвечиваться значок защищенного соединения.
Если щёлкнуть по значку сертификата, можно получить полную информацию о нем:
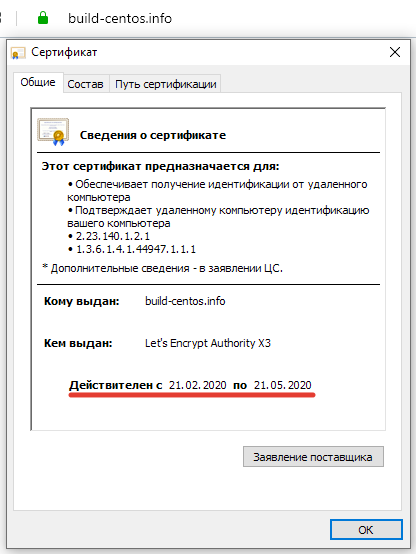
Для нагруженных PHP сайтов на Nginx можно использоваться связку с php-fpm.
Бесплатные Wildcard SSL сертификаты Let’s Encrypt для поддоменов
Чтобы выпустить wildcard сертификат Let’s Encrypt для всех поддоменов, используется другая команда. Кроме того, в DNS настройках вашего домена нужно создать специальную txt-запись. Чтобы выпустить wildcard сертификат для поддоменов, в директории /opt/letsencrypt/ запустите команду:
# certbot run -a manual -i nginx -d *.lets.build-centos.ru
После запуска команды, вам нужно будет пройти всю процедуру валидации домена, в том числе нужно будет создать специальную TXT запись в DNS.
Не нажимайте “Enter” пока не убедитесь, что запись доступна на глобальных DNS. В панели регистратора домена создайте DNS запись типа TXT с именем _acme-challenge и значением, скопированным из консоли certbot.
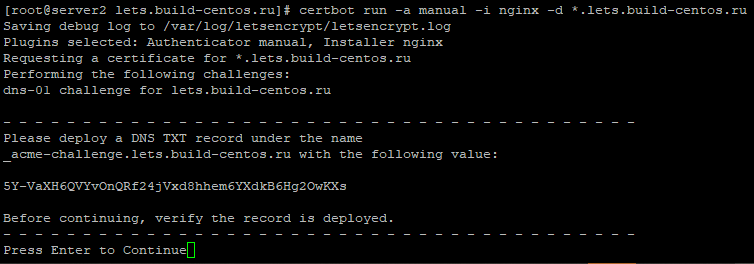
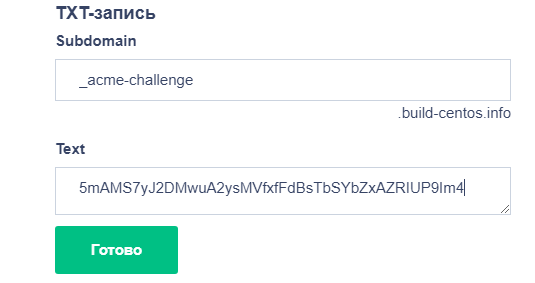
Дождитесь обновления информации в DNS, нажмите Enter и wildcard SSL сертификат будет успешно выпущен:
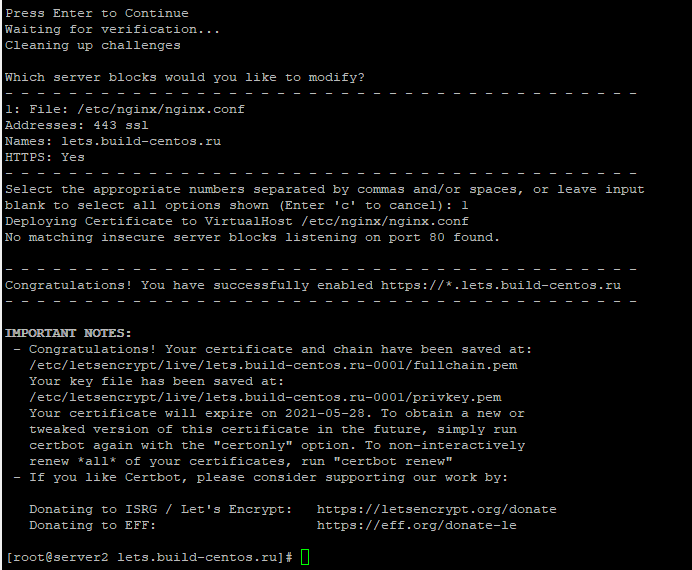
Директория хранения сертификатов и ключей в этом случае отличается от той, в который помещен сертификат для основного домена.
Проверим, работает ли сертификат на поддомене test.build-centos.ru:
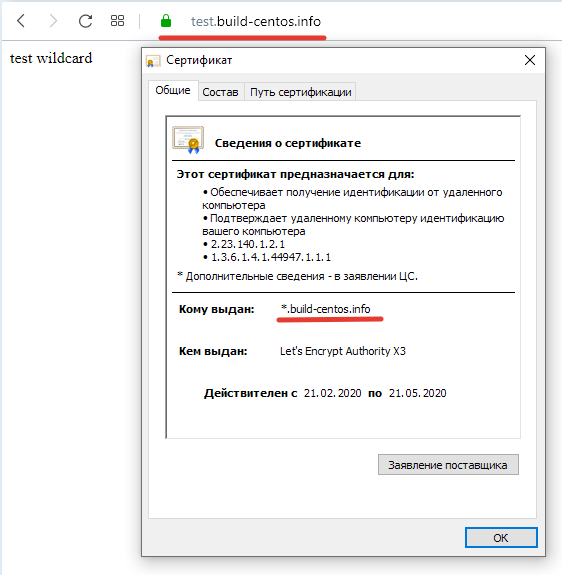
Как видно из скриншота, сертификат выпущен корректно и действителен для всех поддоменов.
Продление сертификатов Let’s Encrypt
Сертификаты Let’s Encrypt выдаются на 90 дней, рекомендуется продлевать эти сертификаты каждые 60 дней.
Чтобы перевыпустить устаревший SSL сертификат Let’s Encrypt, используется команда:
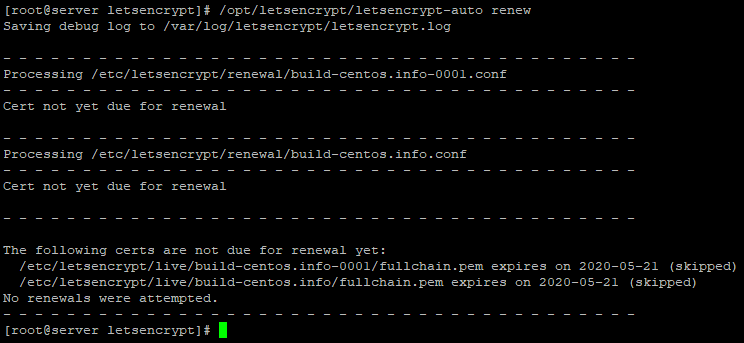
# /certbot renew —dry-run
Если запустить команду сразу после того, как вы выпустили сертификаты, появится уведомление, что сертификат не требует перевыпуска:
Cert not yet due for renewal
Чтобы продление SSL сертификата Let’s Encrypt выполнялось автоматически, нужно добавить задание в cron:
00 00 * * 6 /certbot renew —dry-run >> /var/log/le-renew.log15 00 * * 6 /usr/bin/systemctl reload nginx
Данный cron job будет пытаться каждую субботу продлить сертификата и выполнять мягкую перезагрузку веб-сервера nginx. Все действия по перевыпуску SSL сертификатов будут фиксироваться в лог файле /var/log/le-renew.log.
Все логи Let’s Encrypt хранятся в директории /var/log/letsencrypt.
Таким образом, мы установили бесплатный SSL сертификат Let’s Encrypt на свой web-сайт, работающий на Nginx.
Бесплатные сертификаты Let’s Encrypt также можно использовать и для сайтов на IIS.
Let’s Encrypt и ACME клиенты для Windows
Наличие TLS/SSL сертификата у сайта позволяет защитить данные пользователей, передаваемые по сети от атак человек-посередине (man-in-the-middle) и гарантировать целостность переданных данных. Некоммерческий центр сертификации Let’s Encrypt позволяет в автоматическом режиме через API выпускать бесплатные криптографические TLS сертификаты X.509 для шифрования (HTTPS) . Выдаются только сертификаты для валидации доменов (domain validation), со сроком действия 90 дней (есть ограничение – 50 сертификатов для одного домена в неделю). Но вы можете автоматически перевыпускать SSL сертификат для своего сайта по расписанию.
API интерфейс, позволяющий автоматически выпускать сертификаты называется Automated Certificate Management Environment (ACME) API. Для Windows систем на данный момент имеется 3 самых популярных реализации клиента ACME API:
- Утилита Windows ACME Simple (WACS) – утилита командной строки для интерактивного выпуска сертификата и привязки его к определенному сайту на вашем веб сервере IIS;
- Модуль Powershell ACMESharp – библиотека Powershell с множеством команд для взаимодействия через ACME API с серверами Let’s Encrypt;
- Certify – графический менеджер SSL сертификатов для Windows, позволяет интерактивно управления сертификатами через ACME API.
Клиент WACS для установки TLS сертификата Let’s Encrypt в IIS на Windows Server
Самый простой способ получить SSL сертификат от Let’s Encrypt — воспользоваться консольной утилитой Windows ACME Simple (WACS) (ранее проект назывался LetsEncrypt-Win-Simple). Она представляет собой простой мастер, который позволяет выбрать один из сайтов, запущенных на IIS, и автоматически выпустить и привязать к нему SSL сертификат.
Итак, предположим у нас имеется веб сайт на IIS, развёрнутый под управлением Windows Server 2016. Наша задача, переключить его в HTTPS режим, установив SSL сертификат от Let’s Encrypt.
Скачайте последний релиз клиента WACS со страницы проекта на GitHub https://github.com/PKISharp/win-acme/releases (в моем случае это версия v2.0.10 – файл win-acme.v2.0.10.444.zip).
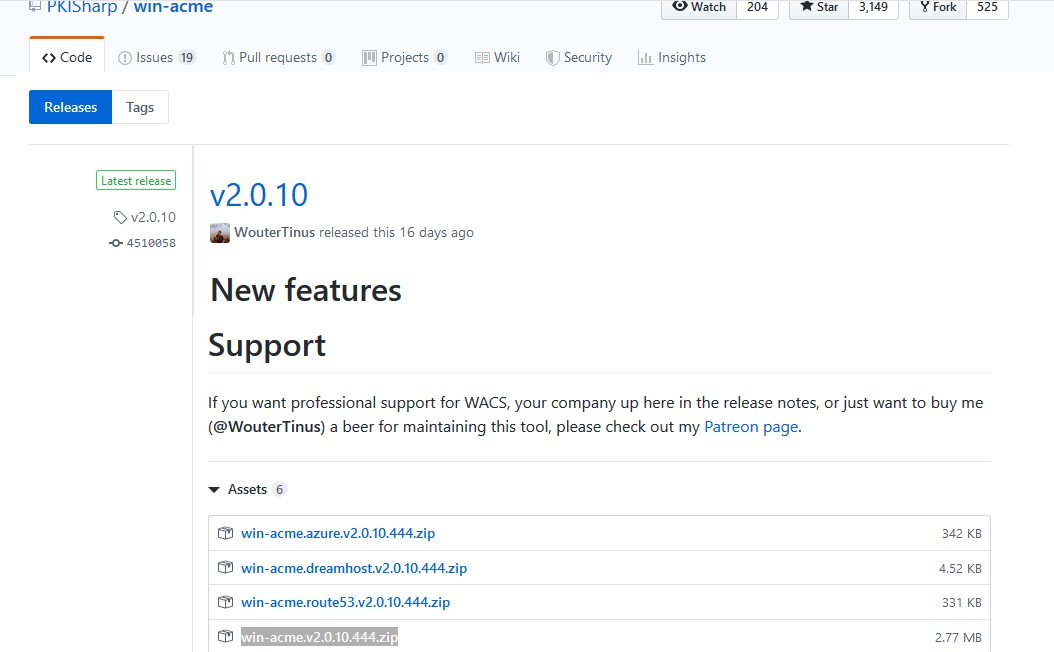
Распакуйте архив в каталог на сервере с IIS: c:\inetpub\letsencrypt
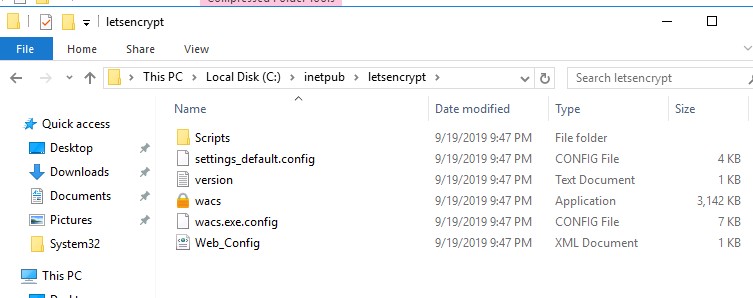
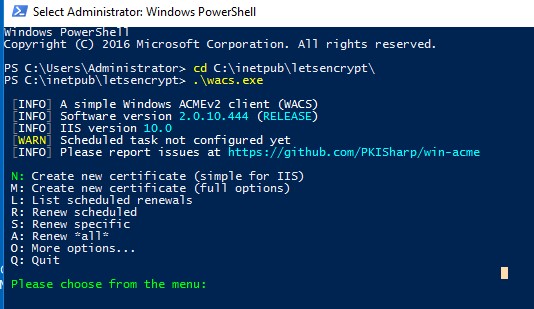
Откройте командную строку с правами администратора, перейдите в каталог c:\inetpub\ letsencrypt и запустите wacs.exe.
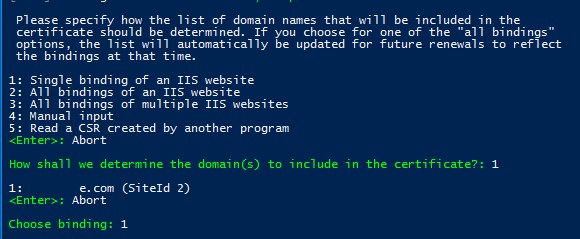
Запустится интерактивный мастер генерации сертификата Let’s Encrypt и привязки его к сайту IIS. Чтобы быстро создать новый сертификат выберите N: — Create new certificates (simple for IIS).
Затем нужно выбрать тип сертификата. В нашем примере нет необходимости использовать сертификат с псевдонимами (несколькими SAN — Subject Alternative Name), поэтому достаточно выбрать пункт 1. Single binding of an IIS site. Если вам нужен Wildcard-сертификат, выберите опцию 3.
Далее утилита выведет список сайтов, запущенных на сервере IIS и предложит выбрать сайт, для которого нужно создать и привязать новый SSL сертификат.
Укажите ваш email, на который будут отправляться уведомления о проблемах с обновлением сертификата сайта и другие о повешения (можно указать несколько email через запятую). Осталось согласится с условиями использования и Windows ACME Simple подключится к серверам Let’s Encrypt и попытается автоматически сгенерировать новый SSL сертификат для вашего сайта.

Процесс генерации и установки SSL сертификата Let’s Encrypt для IIS полностью автоматизирован.
По умолчанию выполняется валидация домена в режиме http-01 validation (SelfHosting). Для этого нужно, чтобы в DNS домена имелась запись, указывающая на ваш веб сервера. При запуске WACS в ручном режиме можно выбрать валидацию типа — 4 [http-01] Create temporary application in IIS (recommended). В этом случае на веб-сервере IIS будет создано небольшое приложение, через которое сервера Let’s Encrypt смогут провести валидацию.
Примечание. При выполнении TLS/HTTP проверки ваш сайт должен быть доступен снаружи по полному DNS имени по протоколам HTTP (80/TCP) и HTTPS (443/TCP).
Утилита WACS сохраняет закрытый ключ сертификата (*.pem), сам сертфикат и ряд других файлов в каталог C:\Users\%username%\AppData\Roaming\letsencrypt-win-simple. Затем она в фоновом режиме установит сгенерированный SSL сертификат Let’s Encrypt и привяжет его к вашему сайту IIS. Если на сайте уже установлен SSL сертификат (например, самоподписанный), он будет заменен новым.
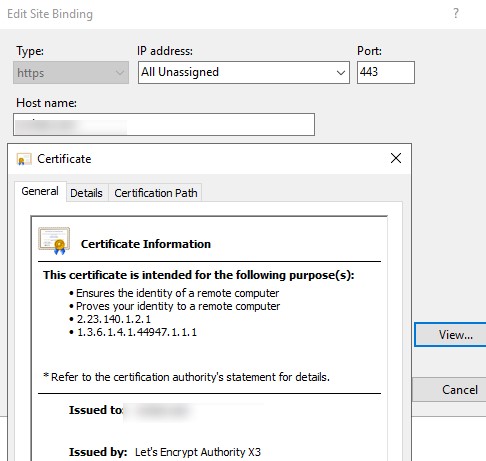
В IIS Manager откройте меню Site Binding для вашего сайта и убедитесь, что для него используется сертификат, выданный Let’s Encrypt Authority X3.
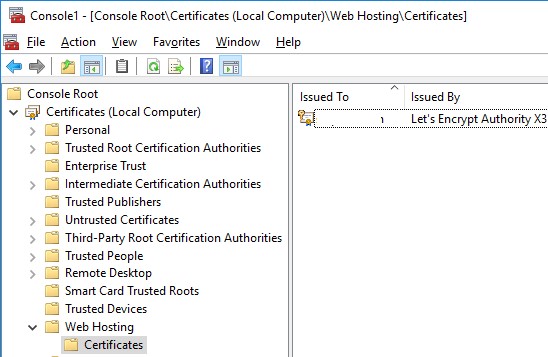
В хранилище сертификатов компьютера сертификат Let’s Encrypt для IIS вы можете найти в разделе Web Hosting -> Certificates.
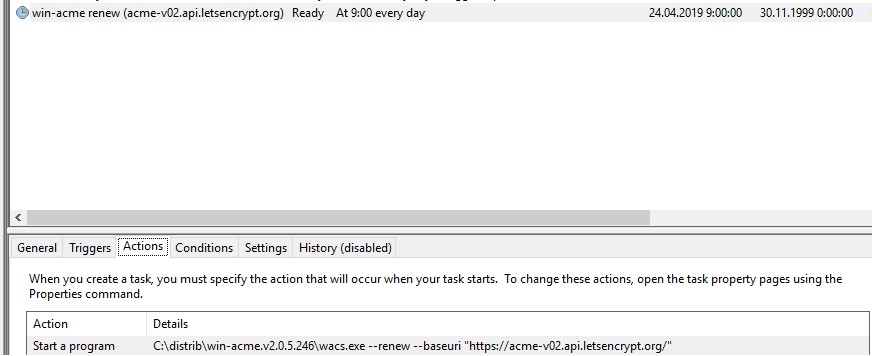
Windows ACME Simple создает новое правило в планировщике заданий Windows (win-acme-renew (acme-v02.api.letsencrypt.org)) для автоматического продления сертификата. Задание запускается каждый день, продление сертификата выполняется через 60 дней. Планировщик запускает команду:
C:\inetpub\letsencrypt\wacs.exe --renew --baseuri "https://acme-v02.api.letsencrypt.org"
Эту же команду вы можете использовать для ручного обновления сертфиката.

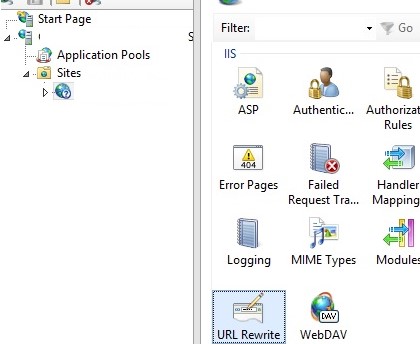
Перенаправление трафика IIS сайта с HTTP на HTTPS адрес
Чтобы перенаправить весь входящий HTTP трафик на HTTPS сайт, нужно установить модуль Microsoft URL Rewrite Module (https://www.iis.net/downloads/microsoft/url-rewrite), и убедиться, что в настройках сайта не включена опция обязательного использования SSL (Require SSL). Осталось настроить редирект в файле web.config:
<system.webServer>
<rewrite>
<rules>
<rule name="HTTP to HTTPS Redirect" enabled="true" stopProcessing="true">
<match url="(.*)" />
<conditions>
<add input="{HTTPS}" pattern="off" ignoreCase="true" />
</conditions>
<action type="Redirect" url="https://{HTTP_HOST}/{R:1}" appendQueryString="true" redirectType="Permanent" />
</rule>
</rules>
</rewrite>
</system.webServer>
Также вы можете настроить перенаправление трафика через URL Rewrite через графический интерфейс IIS Manager. Выберите Sites -> yoursitename -> URL Rewrite.
Создайте новое правило Add Rule -> Blank rule.
Укажите имя правила и измените значения параметров:
- Using -> Regular Expressions
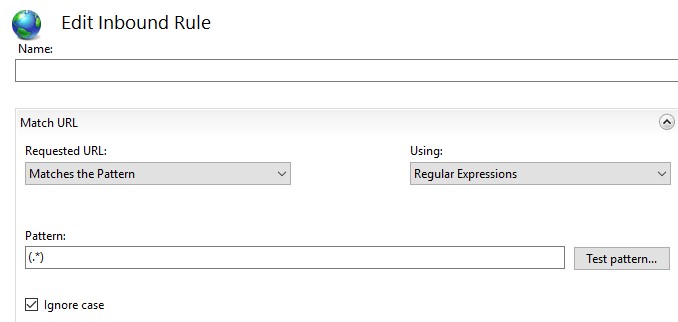
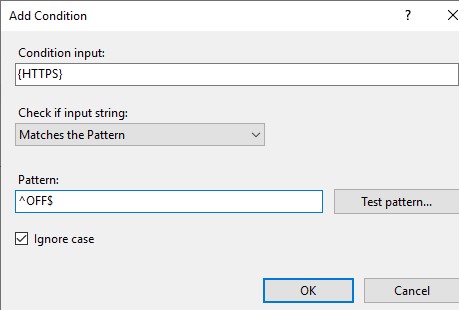
В блоке Conditions измените Logical Grouping -> Match All и нажмите Add. Укажите
- Check if input string -> Matches the Pattern
Теперь в блоке Action выберите:
- Redirect URL -> https://{HTTP_HOST}/{R:1}
Откройте браузер и попробуйте открыть ваш сайт по HTTP адресу, вас должно автоматически перенаправить на HTTPS URL.
Использование сертификата Let’s Encrypt для Remote Desktop Services
Если вы используете для подключения внешних пользователей в корпоративную сеть шлюз Remote Desktop Gateway/ RD Web Access, вы можете использовать нормальный SSL сертификат Let’s Encrypt вместо обычного самоподписанного сертификата. Рассмотрим, как корректно установить сертификат Let’s Encrypt для зажиты служб Remote Desktop Services в Windows Server.
Если на Remote Desktop Gateway сервере поднята также роль RDSH, нужно запретить пользователям Read доступ к каталогу, в котором у вас хранится WACS (в моем примере это c:\inetpub\letsencrypt ) и к каталогу с сертификатами сертификат Let’s Encrypt (C:\ProgramData\win-acme).
Затем на сервере RDP GW, запускаете wacs.exe, как описано выше, и вы выбираете нужный сайт IIS (обычно, Default Web Site). Let’s Encrypt выдает вам новый сертификат, который устанавливается для веб-сайта и в планировщике появляется задание на автоматические обновление сертификата.
Вы можете вручную экспортировать данный сертификат и привязать его к нужным службам RDS через SSL binding. Но вам придется выполнять эти действия вручную каждые 60 дней при перевыпуске сертификата Let’s Encrypt.
Нам нужен скрипт, который бы сразу после получения (продления) сертификата Let’s Encrypt применял бы его для RD Gateway.
В проекте win-acme есть готовый PowerShell скрипт ImportRDGateway.ps1 (https://github.com/PKISharp/win-acme/tree/master/dist/Scripts), который позволяет установить выбранный SSL сертификат для служб Remote Desktop. Главный недостаток скрипта – приходится вручную указывать отпечаток нового сертификата:
ImportRDGateway.ps1 <certThumbprint>
Для автоматического получения отпечатка сертификата с указанного сайта IIS используйте доработанный скрипт ImportRDGateway_Cert_From_IIS.ps1 (основан на стандартном ImportRDGateway.ps1).
Инструкция и модифицированный PowerShell скрипт присланы нашим читателем Антоном, за что посылаем ему лучи благодарности!
Вы можете запустить это скрипт вручную:
powershell -File ImportRDGateway_Cert_From_IIS.ps1
Если у вас RDS Gateway живет на стандартном IIS сайте «Default Web Site» с индексом 0, можете использовать скрипт без изменений.
Чтобы получить ID сайта в IIS, откройте консоль PowerShell и выполните:
Import-Module WebAdministration
Get-ChildItem IIS:Sites
Получите список вида:
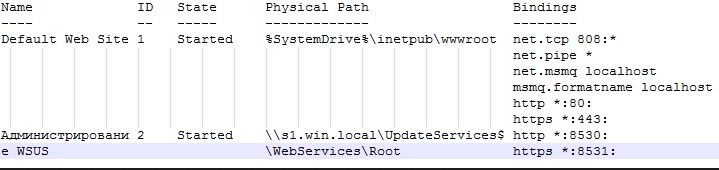
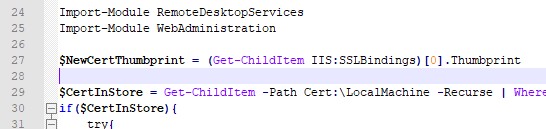
В колонке ID указан индекс вашего сайта, отнимите от него единицу. Полученный индекс вашего сайта нужно указать вместо 0 в 27 строке скрипта PowerShell:
$NewCertThumbprint = (Get-ChildItem IIS:SSLBindings)[0].Thumbprint
Теперь откройте задание планировщика win-acme-renew (acme-v02.api.letsencrypt.org) и на вкладке Action добавьте новое задание, которое запускает скрипт ImportRDGateway_Cert_From_IIS.ps1 после обновления сертификата.
Чтобы не менять разрешения на выполнение скриптов PowerShell, вы можете вызывать скрипт командой:
PowerShell.exe -ExecutionPolicy Bypass -File c:\inetpub\letsencrypt\ImportRDGateway_Cert_From_IIS.ps1
Теперь скрипт привязки SSL сертификата к службам RDS будет выполнятся сразу после продления сертификата Let’s Encrypt. При этом автоматически перезапускается служба RD Gateway командой:
Restart-Service TSGateway
При перезапуске службы TSGateway все текущие сессии пользователей разрываются, поэтому желательно изменить периодичность запуска задания обновления сертфиката на 1 раз в 60 дней.
Также вы можете использовать бесплатные сертификаты Let’s Encrypt в Linux для веб сайтов на Nginx или apache.
Отметим, что сертификаты Let’s Encrypt в настоящий момент широко используются на сайтах многих крупных компаний и им доверяют все браузеры. Надеюсь, что судьба бесплатного центра сертификации Let’s Encrypt не постигнет участь WoSign и StartCom.
Conclusion
In this tutorial you’ve installed the Certbot client, obtained your wildcard certificate using DNS validation and enabled automatic renewals. This will allow you to use a single certificate with multiple subdomains of your domain and secure your web services.
Conclusion
I have demonstrated how to generate and upload SSL certificates to AWS ACM. Personally, I find Certbot very easy to use. I have not hit any issues so far.
Important note, each Certificate is valid for 90 days so it is recommended to renew them every 60 day as per docs.
Hope this is going to help others and speed up their learning.